![Mona in Genshin Impact [best build]](/wp-content/uploads/2023/10/word-image-316411-1.jpg)
A detailed guide to Mona's Genshin impact with recommendations for choosing a build, suitable weapons, artifacts and team. All information on active and passive abilities, as well as features and disadvantages that are worth paying attention to. Everything Mona needs to level up.
Mona - Hydro catalyst legendary rarity. The mysterious astrologer leads a modest lifestyle and works off a debt called “life.” I am sure that simplicity can reveal the truths of the world, and luxury will only hinder this. One day, the mentor instructed Mona to pick up a chest that contained something valuable, but forbade her to look inside if life was precious. Not of her own free will, the astrologer disobeyed the old witch’s orders and is now forced to hide in Monstadt.
| Rating | S-position in dash list |
| Rarity | . |
| when added to the game | September 28, 2020 (patch 1.0) |
| How to get a character | Standard Prayer |
| Element | Hydro |
| Weapon | Catalyst |
| Gender of the character | Female |
| To which group does | Mondstadt |
| constellation name | Crimson Dawn |
| Home region | Mondstadt |
| Mona's birthday | 31 of August |
| Zodiac sign | Virgo |
| Mona's age | 18-19 years |
| Mona's height | 158-163 cm |
| Mona's special dish | Supreme Wisdom (Life) |
| Voice actors |
|
How to get Mona in Genshin Impact
![]()
Mona is a permanent fixture in the standard Wanderlust banner, along with other legendary heroes and weapons. In addition, the character can drop out if you lose any event prayer, as it is considered a standard legendary.
An additional opportunity to obtain Mona will be provided by Prayer of the Chronicles. The next rerun with the participation of an astrologer is expected in update 4.5.
Mona's stats: what increases with elevation
Depending on the level of pumping, Mona’s additional characteristic increases - energy recovery. At the same time, the basic parameters are increased health, attack power и of protection. The exact values of each indicator are shown in the table:
| Level of | Base HP | Basic Attack | Basic protection | Energy recovery% |
|---|---|---|---|---|
| 1 | 810 | 22 | 51 | 0% |
| 20 | 2102 | 58 | 132 | 0% |
| 40 | 4185 | 115 | 263 | 0% |
| 50 | 5383 | 148 | 338 | 8% |
| 60 | 6752 | 186 | 424 | 16% |
| 70 | 7964 | 220 | 500 | 16% |
| 80 | 9184 | 253 | 576 | 24% |
| 90 | 10409 | 287 | 653 | 32% |
Thus, at level 90 Mona has 132% energy recovery and 26,4% of her own Hydro damage bonus.
Mona's abilities

Mona's basic attacks and abilities deal Hydro damage to both solo and area targets. Using an elemental skill, summons a phantom that distracts enemies and deals damage in a small radius. With an explosion of elements, it catches monsters in traps and imposes a negative status that increases the damage of allies on the target.
Let's take a closer look at how Mona's skills work and in what order to upgrade them. In addition, we will analyze the constellations and separately highlight the most useful of them.
Basic skills (active skills)
- Water Circles (Normal, Charged, Falling Attack)
Normal attack: attacks with bubbles that deal Hydro damage up to four times.
Charged Attack: A quick spell that deals Hydro area damage and drains stamina.
Plunging Attack: rapidly flies to the ground, having accumulated the energy of water. Upon landing, Hydro deals area damage.
- Reflect Doom (Elemental Skill)
Cooldown: 12 sec.
Summons a phantom that distracts enemy attacks and deals Hydro damage in a small radius. The phantom explodes before disappearing. Long press allows you to jump back after creating.
- Star Phantasm (Elemental Burst)
Bubble duration: 8 sec.
Omen Duration: 4 sec.
Cooldown: 15 sec.
Energy consumption: 60 units
Contains enemies in Shadow Bubbles and applies the effect Omena. All opponents receive the Wet status, and weak monsters caught in the trap lose the ability to move and attack.
When the duration expires or when enemies are hit, the Shadow Bubbles will burst. The damage dealt by Hydro is the sum of the bubble explosion multiplier and the bonus of damage received by the enemy from Omen.
- Illusory Flow (alternate sprint)
Replaces the standard movement acceleration. In the open world, it allows you to move on the surface of the water, and during battle, apply the Wet status to enemies and summon phantoms.
The order of leveling talents
The priority of leveling depends on Mona's role in the team:
- For buffer has the greatest value ultimate, since from it the astrologer applies the Omen enhancement for his main DD. You don’t have to pump up the E-shka at all if Mona plays in Cryo squads and is not collected in damage.
- Mona, as the main damage dealer and sub-deader, relies on all three talents: superpower, elemental skill и normal attack, so resources go into skills evenly.
Passive skills
| Talent | What gives |
|---|---|
| Old woman, you can't find me! | If after 2 sec. After activating the Illusory Flow skill, there are enemies around Mona, she creates one phantom. A phantom created in this way lasts for 2 seconds, the damage from its explosion is equal to 50% of the skill Reflect Fate. |
| Let fate roll the dice! | Increases Mona's Hydro damage bonus by 20% of her energy recovery. |
| Principles of astrology | When crafting Ascension materials, weapons have a 25% chance to recover some of the used materials. |
Constellations
All constellations are presented in the table:
| number | Name | <font><font>Materials</font></font> |
|---|---|---|
| 1 | Flood prophecy | A character from your squad hits an enemy with the Omen status for 8 sec. enhance the effects of hydro reactions:
|
| 2 | moon chain | Normal attack hits have a 20% chance to automatically trigger a charged attack. Can occur once every 5 seconds. |
| 3 | The endless rotation of the planets | Increases the level of the Star Phantasm skill by 3. Max. level: 15 |
| 4 | Prophecy of Oblivion | Hits by any member of your squad on an enemy with the Omen status increase the crit chance. hit by 15%. |
| 5 | Fate's mockery | Increases the level of the skill Reflect Fate by 3. Max. level: 15 |
| 6 | Rhetoric of cataclysm | Every second of movement in the form of Illusory Flow increases the damage of Mona's next charged attack by 60%. In this way, you can get no more than 180% of the damage bonus of a charged attack. Lasts no more than 8 seconds. |
Mona's best constellations are C1, C4.
- first constellation Increases damage from elemental reactions between Hydro and Electro, Pyro or Anemo. Increased damage is a major bonus for teams playing with these types of synergies. However, it is worth considering that Omen's passive only works on the second hit. The second part of the passive effect also works incorrectly.
- fourth constellation additionally increases the chance of a critical hit against enemies with the Omen status. The constellation triggers after each use of the ultimate ability, but only for 4 seconds while Omen lasts. It gains the greatest value in teams with instant destructive damage.
Advantages and disadvantages of Mona

Let's look at the positive and negative aspects of playing as Mona.
| Advantages | Disadvantages |
| High damage multipliers from the ultimate, thanks to which the astrologer deals devastating damage. The character is excellent for high-level Abyss and open world boss battles, closing any content in a matter of seconds. | Expensive, but worth the build. For high damage, you need to thoroughly approach the farming of artifacts, since a hodgepodge with good stats is significantly inferior to a full set of energy restoration. |
| Passive talent “Let fate roll the dice!” ideally synergizes with the “Emblem of Shattered Fate” set, multiplying damage through the assembly of one characteristic (energy restoration). | It does good damage in an area exclusively from an explosion of elements. The elemental skill is much inferior in damage to other skills and is more suitable for inflicting Hydro status. |
| Can play several roles at once and suits many teams. Damage and buff from the ultimate are revealed in squads with AoE damage dealers. Also plays the role of Hydro applicator, which is useful in the Steam and Freeze teams. Since the illusory phantom distracts enemies towards itself, it plays well with Ganyu. | Low base defense and health require a powerful support with healing skills or a shield in the team. Dodging through sprinting can seriously hurt damage as it wastes stamina. |
| Demonstrates good main-dead potential thanks to high charge attack damage multipliers. | Dynamic gameplay, not suitable for every player. To maximize damage, you need to switch between squad members, constantly trigger elemental reactions, and move around the field. |
| Suitable for beginners due to its simple mechanics and the ability to build support through three-star builds: the “Instructor” artifact set and the “Thrilling Tales of Dragon Slayers” weapon. |
Mona leveling
Next, let's look at what resources and materials will be required to pump Mona to the maximum level, as well as elevate her talents.
Elevations
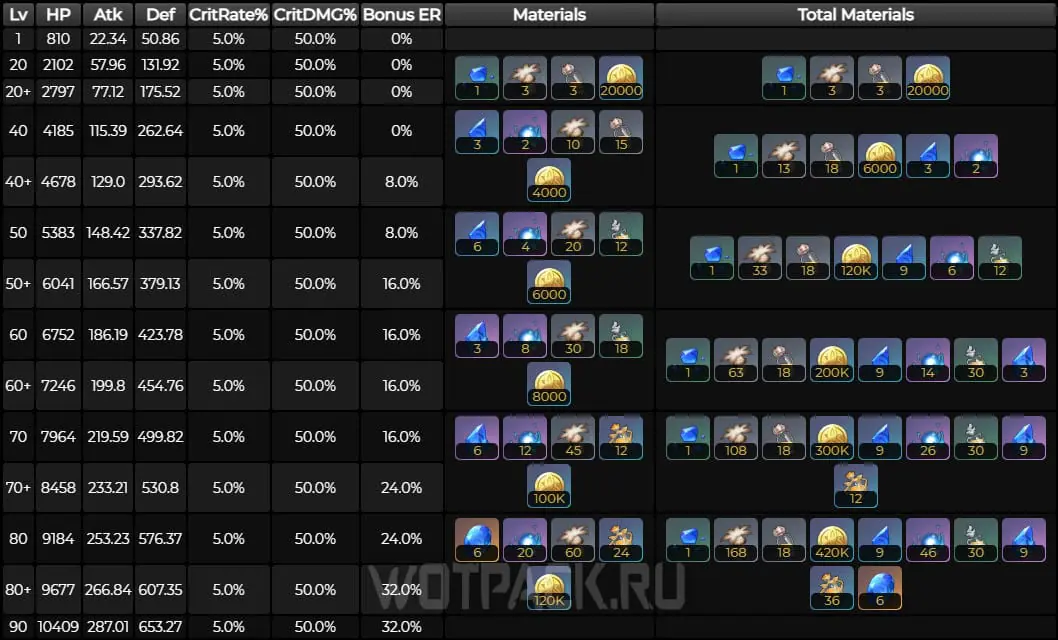
To raise Mona to level 90, you need to spend the following components:
- Lapis Lazuli Varunada — material for the elevation of Hydro elemental characters, which drops out after killing world and weekly bosses: Oceanid, Aeonblight Drake, Hydro hypostasis, Primo Geovishap, Storm Horror, childe, Azhdaha, Seki no Kami.
- Skipper nectar is a resource obtained from jumper.
- Filanemo mushroom - a Monstadt curiosity that can be found in the settlements of the region.
- Cleansing Heart - a component dropped from Oceanid.
- 420 000 Mora and 421 hero experience.
Talents
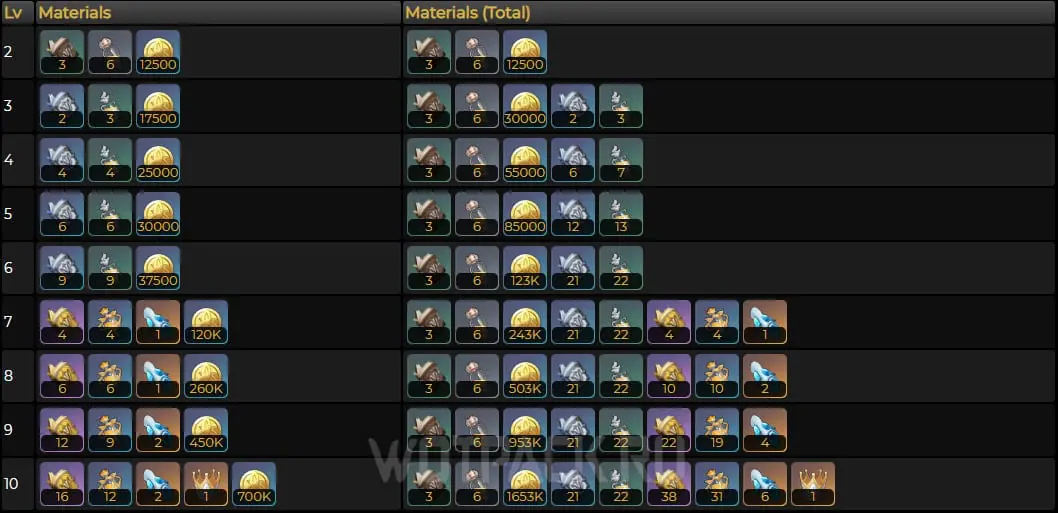
To upgrade Mona's talents, in addition to jumping nectar, you will also need:
- Teachings, instructions, philosophy about “Struggle” - talent books, which can be farmed in the Monstadt dungeon forgotten canyon by Tuesdays, fridays и Sundays.
- Ring of Boreas is an advanced material for leveling up talents, dropped from Wolf Lord.
- Crown of Insight — a rare component required to level up a talent to the maximum level 10.
- 1 654 000 Mora.
You can calculate the exact number of components using the official calculator.
Best Mona Build in Genshin Impact

In any battle, Mona works as a Hydro applicator and buffer from her ultimate, but can also deal damage while acting as a secondary damage dealer or main damage dealer. Depending on the position, a build for Mona is selected:
- Buffer supports the team by using elemental burst on cooldown to inflict Omen status as often as possible. Among the characteristics, the first place comes energy recovery, which is collected through sets of artifacts and weapons with passive effects that are useful for the team. The remaining stats in artifacts are collected optionally.
- For assembly with a bias towards reinforcement personal DPS will need more attention critical characteristics, attack power и mastery of the elements. Since Mona increases her elemental damage bonus through energy recovery, the parameter does not lose its value and is still a priority.
Let's take a closer look at the distinctive features of builds and in what cases it is more appropriate to assemble one or another assembly.
| Buffer | Damager |
| Inexpensive yet powerful team support build. Ideal for accelerating the damage of an existing main-dead unit without the cost of leveling up. | More expensive, but pays off assembly. Makes a huge contribution to the team's damage due to the damage from the rupture of Shadow Bubbles. |
| A recommended option for beginners, as it requires a minimum amount of investment. There is no need to balance stats. | Can take the role of the main damage dealer in a team playing from Para. |
| Damage bonuses allow you to kill bosses and elite enemies with one hit, which makes farming and progressing much easier Twisted Abyss. |
Recommended characteristic values
Building Mona into a damage dealer requires more than just standard attack stats Crete. chance/damage, attack power, elemental damage bonus, but also high energy recovery. Elemental Mastery necessary only in units from the Steam reaction, and other parameters do not affect the damage in any way.
In the case of a buffer, energy recovery is the only priority stat. An explosion of elements is not very expensive, but the heroine does not cope well with generating energy, so she needs batteries and elemental particles from her allies. There are no requirements for other characteristics.
Below is a table of stats that you should look for in damage artifacts:
| Artifact | Main characteristic | Additional stats |
|---|---|---|
 Flower of Life Flower of Life | HP (permanent) | Energy recovery% Crete. damage/chance% Attack Power% |
 Feather of Death Feather of Death | Attack Power (Permanent) | Energy recovery% Crete. damage/chance% Attack Power% |
 The sands of Time The sands of Time | Attack Power%/Energy Recovery% | Energy recovery% Crete. chance/damage% Elemental Mastery Attack Power% |
 space cup space cup | Hydro Damage Bonus% | Energy recovery% Crete. damage/chance% Attack Power% |
 Crown of Mind Crown of Mind | Crete. damage% | Crete. chance% |
Total parameter values for a comfortable game:
- ATK: not less than 1500 units.
- Energy recovery: more than 180% with the Emblem of Shattered Fate set, in other cases up to 170%.
- Critical Chance and Damage: maintain a 1:2 ratio, for example during critical. damage of 120%, you should pay attention to the chance and increase it to 60%.
- Elemental Mastery: optional characteristic, in the Steam command up to 250 units.
Best weapon
Mona's weapon is selected taking into account the chosen strategy - building into a buffer or damage dealer:
- For strengthening the team an astrologer will need a book with useful passive effects; the main characteristics of the weapon are taken into account last.
- Catalyst main and sub-dd must increase critical damage, attack power, or have a passive to increase normal and charged attacks. Elemental mastery is only necessary in units with the elemental reaction of Steam, and energy restoration should be collected to the maximum through artifacts.
Weapons for Mona Damage Build
The following catalysts take into account the needs of Mona's damage dealer, so they are great for high personal damage:
| Name | Description | Recommendation |
|---|---|---|
 The Widsith The Widsith⭐⭐⭐⭐ Basic Attack: 42-510 Critical Damage: 12%-55,1% | When switching to a character, a random melody plays for 10 seconds. The effect works every 30 seconds:
| Epic Critical Catalyst. damage that is best suited for a pocket ult. Despite the randomness of the buffs, the weapon's average damage is superior to many alternatives. Taking into account that the cooldown of Mona's ultimate is half the cooldown of the book, you can easily adapt to the mechanics of the catalyst so that every second ultimate is boosted. |
 Memory of dust Memory of dust⭐️⭐️⭐️⭐️⭐️ Base damage: 46-608 Attack Power: 10,8%-49,6% | Increases shield strength by 20%-40%. On hit, increases attack power by 4%-8% within 8 sec. The effect can stack up to 5 times and occur every 0.3 seconds. In addition, while protected by a shield, the attack power bonus of this effect is increased by 100%. | A strong option that is more suitable for main DD than burst. To receive all bonuses, you must be on the field under a shield and deal damage to opponents. If the astrologer has the opportunity to take away part of the time on the field from the main damage dealer, then it is suitable for a sub-dead build. |
 Treasury supervision Treasury supervision⭐️⭐️⭐️⭐️⭐️ Basic Attack: 48-674 Critical Hit Chance: 4,8-22,1% | Increases attack power by 16-32%. When a character's current HP increases or decreases, for 4 sec. Normal attack damage increases by 16-32%, and a charged attack - by 14-28%. The effect stacks up to 3 times and occurs no more than once every 1 sec. When an equipped character gains 0,3 levels, attack speed increases by 3%. | A powerful weapon for the main damage dealer, but with complex mechanics. The catalyst increases the critical chance and attacks from the hand, all effects last while the character is on the field and loses health. To do this, you need to expose yourself to attacks from enemies and have a healer in your squad, which is not always convenient. |
 Skyward Atlas Skyward Atlas⭐️⭐️⭐️⭐️⭐️ Basic Attack: 48-674 ATK: 7,2-33,1% | Increases elemental damage bonus by 12-24%. When hit with a normal attack, there is a 50% chance to gain a blessing of the clouds that attacks nearby enemies for 15 seconds and inflicts 160-320% attacks. May occur once every 30 seconds. | An excellent option for attack power and elemental damage. These bonuses affect both the ultimate and the hand, increasing the overall damage. The second part of the passive ability does not help much in battle, so it is not critical for sub-damping. |
 Song of the Vast Blue (F2P) Song of the Vast Blue (F2P)⭐⭐⭐⭐ Base Damage: 44-565 Energy recovery: 6,7%-30,6% | Within 6 sec. After hitting an enemy with a normal or charged attack, the damage of the normal attack will increase by 8-16%, and the damage of a charged attack is reduced by 6-12%. The effect can stack up to 3 times and occurs once every 0,3 sec. | A great option for main DD with energy recovery, which is also easy to use. Passively enhances key damage methods: Hydro damage bonus, elemental burst, normal and charged strikes. |
 Lost Prayer to the Sacred Winds Lost Prayer to the Sacred Winds⭐️⭐️⭐️⭐️⭐️ Basic Attack: 46-608 Critical Hit Chance: 7,2-33,1% | Increases movement speed by 10%. During combat every 4 seconds gives 8-16% elemental damage bonus, stacking up to 4 times and ending when the character dies or leaves the battlefield. | A legendary catalyst for critical chance, suitable exclusively for the main damage dealer. The weapon's effect requires you to be on the field most of the time and not leave it throughout the entire rotation. It is also recommended to select heroes with long-term skills for your team. |
 Dodoko stories (F2P) Dodoko stories (F2P)⭐⭐⭐⭐ Base damage: 41-454 Attack Power: 12%-55,1% | Normal attack hits make charged attacks on 16%-32% stronger for 6 seconds, and charged attacks in turn increase attack power by 8%-16% for 6 seconds. | Option for main DD for attack power and increased hand damage. Unlike “Song of Vast Azure”, it mainly enhances normal and charged attacks, without helping in collecting energy recovery. |
 Sun pearl Sun pearl⭐⭐⭐⭐ Basic attack: 42-510 Critical Hit Chance: 6%-27,6% | Hitting with a normal attack increases the damage of elemental skills and elemental explosions by 20-40% within 6 sec. Conversely, hits with elemental skills and elemental explosion increase the damage of a normal attack by 20-40% within 6 sec. | Weapons from Battle Pass works simultaneously for the main and secondary damage dealer. However, it does not demonstrate impressive damage performance, so it is not recommended to specifically purchase this catalyst. |
 The sparkle of clear waters (F2P) The sparkle of clear waters (F2P)⭐⭐⭐⭐ Base damage: 44-565 Attack Power: 6%-27,6% | Activating an elemental skill increases the damage bonus of all elements by 8-16% for 15 sec. and applies once every 10 sec. Life debt equal to 24% of max. HP. When Life Debt is removed, bonus damage with all elements for 15 sec. increases by 2-4% for every 1000 units given. Life Debt HP. Damage bonus with all elements cannot exceed 12-24%. | Free craft book from Fontaine. A good option for both main-dd and sub-dd. Adds percentages of attack power and increases elemental damage. Can work well in a team with Hydro Resonance. |
 Eye of Oath Eye of Oath⭐⭐⭐⭐ Base damage: 44-565 Attack Power: 6%-27,6% | Using an elemental skill increases energy recovery by 24-48% within 10 sec. | Event weapons, good equipment for any play style. In rotation, it is recommended to use the elemental skill strictly before the ultimate. |
 Eye of Perception Eye of Perception⭐⭐⭐⭐ Base damage: 41-454 Attack Power: 12%-55,1% | On hit with a Light or Charged Attack, there is a 50% chance to launch an Eye of Mind that deals 240-360% attack power damage. It can bounce from enemy to enemy up to 4 times. May occur once per 8 sec. | A catalyst for attack power that can be equipped when there are no alternatives. |
 Montenegrin agate (F2P) Montenegrin agate (F2P)⭐⭐⭐⭐ Base damage: 42-510 Crete. damage: 12%-55,1% | Defeated enemies increase attack power by 12-24%. Lasts 30 seconds. The effect can stack up to 3 times. The duration of additional effects does not depend on each other. | Catalyst from Paimon store for critical damage. The passive cannot be activated in a boss fight, but works great against large groups of enemies. |
 Nautical atlas (F2P) Nautical atlas (F2P)⭐⭐⭐⭐ Base damage: 44-565 Elemental Mastery: 24-110 | Within 10 sec. after calling an elemental reaction gives 8-16% elemental damage bonus. Can be folded up to 2 times. | Crafted weapons from Li Yue, suitable for newcomers to Para teams. At later stages of the game it shows itself to be worse than equipment in terms of attack power and must be replaced. |
Weapons for building Mona Buffer
Below are catalysts that have buffs for the squad:
| Name | Description | Recommendation |
|---|---|---|
 Dragon Slayer Epic Dragon Slayer Epic⭐⭐⭐ Basic Attack: 39-401 HP: 7,7%-35,2% | When switching a character, it increases the attack power of the character that entered the battlefield by 24-48% within 10 sec. Can occur once every 20 seconds. | A current option that allows you to greatly increase the damage of the main DD. Due to the low rarity, it is easy to level up elevations, and the passive effect works from the pocket. |
 Codex Favonia Codex Favonia⭐⭐⭐⭐ Base damage: 42-510 Energy recovery: 10%-45,9% | Critical attacks have 60-100% Chance to create elemental particles that restore 6 health. energy. Occurs once per 12-6 sec. | An excellent catalyst that simultaneously increases the Hydro damage bonus through energy restoration and generates particles for the squad's ultimates. |
 Ring of Hakushin (F2P) Ring of Hakushin (F2P)⭐⭐⭐⭐ Base damage: 44-565 Energy recovery: 6,6%-30,6% | When a character equipped with this weapon triggers a reaction associated with the Electro element, all nearby party members whose element matches that reaction receive 10-20% bonus damage to own element for 6 sec. Elemental damage bonuses gained this way do not stack. | The best catalyst for supports in teams playing from the reaction Charged. The Astrologer can easily cause a reaction from the pocket so that Electro damage gets a boost to elemental damage. |
 wandering star wandering star⭐⭐⭐⭐ Base damage: 42-510 Elemental Mastery: 36-165 | Every 10 sec. the following effect is triggered: the attack power of the character equipped with this weapon is increased by 24-48% from Elemental Mastery for 12 sec. Nearby party members gain 30% of this effect. If other party members also have this weapon, the effect stacks. This effect triggers even if the equipped character is not on the battlefield. | A situational weapon for a squad that relies on Par reaction. Especially if the artifacts have accumulated a lot of elemental mastery. |
Best Artifacts
Artifacts for Mona, like weapons, are selected depending on the role. While the buffer somewhat sacrifices its damage for the benefit of the team, the damage dealer is aimed at increasing personal potential.
Artifacts for building Mona damage dealer
A damage dealer's kit must take into account how much time Mona spends on the field and how exactly she deals damage. Playing styles can be divided into:
- Sub-dd via ult. Sets that increase the damage of elemental explosions or their combinations with sets for bonus Hydro damage, energy recovery and attack power are suitable.
- Main-dd, relying on punches from the hand. Most often, full sets are collected for the bonus for charged attacks or Hydro damage.
The following sets and their combinations are suitable for Mona's damage build:
| Name | Effects | Recommendation |
|---|---|---|
 Emblem of Severed Fate Emblem of Severed Fate⭐⭐⭐⭐ ⭐⭐⭐⭐⭐ | 2 parts: Increases energy recovery rate by 20%. 4 parts: Increases elemental burst damage by an amount equal to 25% of your Energy Regeneration value. The effect can be increased to a maximum of 75%. | The most powerful set for elemental explosion damage. Increases the damage of the ultimate in proportion to the energy recovery value and is ideally combined with the heroine’s passive “Let fate roll the dice!”, which also increases the Hydro damage bonus. Has high requirements for energy recovery (>180%), so a good build is expensive and takes a lot of time to farm. |
 Dream of a nymph/Heart of the depths/Noblesse Oblige Dream of a nymph/Heart of the depths/Noblesse Oblige | 2 parts: 15% bonus to Hydro damage. 2 parts: Increases elemental explosion damage by 20%. | A two-piece combo for a sub-DD ult. Slightly inferior to the full set above, but with good stats it performs well. |
 Heart of the depths Heart of the depths⭐⭐⭐⭐ ⭐⭐⭐⭐⭐ | 2 parts: Gives 15% bonus Hydro damage. 4 parts: Increases normal and charged attack damage by 30% for 15 seconds. after using an elemental skill. | Set for the main damage dealer. Works after using an elemental skill, buffing damage from the hand. It will be best revealed with a catalyst of similar mechanics, for example, "Song of the Vast Azure" or "Sparkle of Clear Waters". A more accessible set, considering that artifacts can be obtained through alchemy Reliquary. |
| Dream of a nymph ⭐⭐⭐⭐ ⭐⭐⭐⭐⭐ | 2 parts: Gives 15% bonus Hydro damage. 4 parts: Hit the enemy with a normal attack, charged attack, falling attack, elemental skill, and elemental burst for 8 sec. create 1 level of Nymph Reflection. When 1/2/3 or more levels of Nymph's Reflection are active, attack power increases by 7%/16%/25% and Hydro damage bonus by 4%/9%/15%. The levels of Nymph Reflections created by normal attacks, charged attacks, fall attacks, elemental skills, and elemental bursts exist independently of each other. | A powerful kit that fits main-dd. The game with this set is built around basic attacks, so the damage from the ultimate is much lower in this case. |
⭐⭐⭐⭐ ⭐⭐⭐⭐⭐ | 2 parts: Increases Elemental Mastery by 80. 4 parts: Increases the damage of a charged attack by 35% if the character uses a catalyst or ranged weapons. | Almost free damage kit for charged attacks. It is farmed passively during the rise of characters, as it drops from bosses. Raises elemental mastery, making it suitable for reactionary teams. |
| Dream of a nymphHeart of the depths | 2 parts: Bonus Hydro Damage 15% 2 parts: Bonus Hydro Damage 15% | A combination of sets for the Hydro damage bonus. Can be used as an intermediate build while the desired kit is being assembled. |
Artifacts for assembling Mona Buffer
Artifacts for Mona as a buffer are much easier to pick up, since the game does not have such a wide range of kits for supports:
| Name | Effects | Recommendation |
|---|---|---|
| Emblem of Severed Fate ⭐⭐⭐⭐ ⭐⭐⭐⭐⭐ | 2 parts: Increases energy recovery rate by 20%. 4 parts: Increases elemental burst damage by an amount equal to 25% of your Energy Regeneration value. The effect can be increased to a maximum of 75%. | In the case of assembling the Emblem for Mona Buffer, the requirements for characteristics are much lower: the damage bonus from the Omen status is required, and not the damage itself. The set helps to quickly generate energy for elemental explosions and passively increases damage. |
 Noblesse Oblige Noblesse Oblige⭐⭐⭐⭐ ⭐⭐⭐⭐⭐ | 2 parts: Increases elemental explosion damage by 20%. 4 parts: Activating an elemental explosion increases the attack power of all party members by 20% for 12 seconds. | Four parts of the set increase the attack power of the entire squad after using an elemental explosion. Given the low cooldown of the ultimate, the window without a bonus is 3 seconds. The only caveat is that Mona must be the only carrier, since the passive effect does not stack. |
 Millelite durability Millelite durability⭐⭐⭐⭐ ⭐⭐⭐⭐⭐ | 2 parts: Increases HP by 20%. 4 parts: When an elemental skill hits enemies, the attack of all nearby characters in the squad is increased by 20%, and their shield strength is increased by 30%. The effect lasts 3 seconds. and can occur 1 time every 0,5 seconds. This effect can be activated even if the character equipped with this set of artifacts is not on the battlefield. | An optional support kit that allows you to buff the team's attack power from your pocket. With good stats, you can bet on an astrologer, but the set does not affect her personal damage in any way. |
 Instructor Instructor⭐⭐⭐ ⭐⭐⭐⭐ | 2 parts: Increases Elemental Mastery by 80. 4 parts: Calling an elemental reaction increases the elemental mastery of all party members by 120. within 8 sec. | A good option for initial ranks and packs that play from elemental reactions. |
Units for Mona
The astrologer is universal and self-sufficient in terms of gameplay, so it suits many teams. Heroes with high area damage, playing off reactions with Hydro or attack buffers to accelerate damage, are selected for Mona’s squads.
Best characters
There are many characters in the game that the astrologer will play well with. For example, a phantom attracts the attention of enemies, which will help in dealing damage to archers or catalysts. The heroine's hydro status will be useful in a team that plays on elemental reactions. Damage from an elemental explosion can compete with top-tier damage dealers dash list, and Omen's massive buff is good for crowds of enemies.
Main-dd
Characters who can take the role of the main damage dealer in Monoi teams.
| Character | Element | Weapon | Recommendation |
|---|---|---|---|
 Ayaka Ayaka |  Cryo Cryo |  One handed sword One handed sword | Keeps opponents frozen throughout the battle using an elemental ability and infusion. With the Blizzard set, it also receives a critical chance bonus and deals consistently high damage. |
 Ganyu Ganyu | Cryo |  Bow Bow | Main damage dealer that deals high area damage through charged attacks. The Phantom holds the attention of enemies and imposes Hydro status, and the mobility of the astrologer allows you to always be at a decent distance from opponents. |
 Wriothesley Wriothesley | Cryo |  Catalyst Catalyst | A melee Cryo Catalyst for which Mona also works as a Hydro Applicator. Has a powerful superpower, easily accelerated to high numbers under the Omen buff. |
 Wanderer Wanderer |  Anemo Anemo | Catalyst | Good damage dealer from hand. Gain additional energy for an elemental skill when in contact with Hydro. The heroes' ultimates have the same cooldown time; in addition, the Wanderer's elemental explosion deals area damage several times, making the most of Omen's effects. |
 Raiden Raiden |  electro electro |  A spear A spear | Has strong damage control potential. Requires expensive ultimates for the team, as well as their frequent use, in return it restores energy to allies. Mona's Elemental Burst has a medium cost but low cooldown, so the characters work well together. |
 Cyno Cyno | electro | A spear | Electro main-dd, playing from the mastery of the elements. Requires a sub-DD with long-term abilities for the team, since he cannot go into the pocket so as not to disrupt the state of the ultimate. |
 Al-Haytham Al-Haytham |  Dendro Dendro | One handed sword | Dendro is a damage dealer who, like Saino, plays from his elemental mastery. Mechanics allow you to permanently close the Budding reaction using infusion and Mirrors of Light. |
 Mavuika Mavuika |  Pyro Pyro |  Two-handed sword Two-handed sword | Mona's Hydro status won't be enough to consistently react to Mavuiki's Steam, but Mona can still be considered as a buffer. |
 Hu Tao Hu Tao | Pyro | A spear | One of the best potential teammates playing in the region. The skill converts damage into Pyro, and the ultimate deals devastating damage over a huge area. The Astrologer's abilities will greatly increase the damage dealt due to the Steam reaction and Omen status. |
 Yanfei Yanfei | Pyro | Catalyst | Excellent Pyro damage dealer for solo targets and area. The seal mechanic allows you to reduce the waste of stamina while increasing damage. At C4 it also provides the unit with a shield. |
 Klee Klee | Pyro | Catalyst | Knight Sparkle plays well with the reaction of couples, so the Hydro application will be useful to her. The Phantom also has the useful ability to attract enemy attacks onto itself, grouping melee monsters for a charged attack. |
 Tartaglia Tartaglia |  Hydro Hydro | Bow | Hydro main DD with mixed fighting styles. The close-range ult will perform well under the bonuses of the Omen status. |
 Neuvillette Neuvillette | Hydro | Catalyst | Hydro damage dealer through charged attacks, with damage scaling based on health. Together with Mona, he will close Hydro Resonance and receive an increase in treatment. |
 Clorinda Clorinda | electro |  One handed sword One handed sword | Clorinda's stance lasts a fairly short amount of time, so the short duration of Mona's Omen is not critical to the value of the buff. When playing this duo, it is better to collect Mona completely as a support, without focusing on additional damage. |
Sub-dd
Heroes that deal damage without being on the field.
| Character | Element | Weapon | Effects |
|---|---|---|---|
 Rosary Rosary | Cryo | A spear | A decent Cryo battery, applicator and damage dealer from the ultimate. Shares a percentage of its critical chance, so it is well suited for rotation with procasters in battle. |
| Cryo | Catalyst | Inflicts periodic Cryo damage on enemies. An explosion of elements restores health depending on the strength of the attack. | |
 Beidou Beidou | electro |  Two-handed sword Two-handed sword | Electro pocket damage dealer, source of mass elemental status. Powered by normal and charged strikes, launching chain lightning that travels between enemies. It also reduces damage and can absorb some of the damage with a shield. |
 Fischl Fischl | electro | Bow | Pocket-dd with damage to one target. With her skills, the Princess of Condemnation summons a companion for joint attacks. At C6 he reveals himself as a full-fledged sub-deader, carrying out attacks together with the active hero. Electro reactions also trigger additional damage to enemies. |
 Yae Miko Yae Miko | electro | Catalyst | A completely self-sufficient Electro sub-dd. Creates up to three cherry blossoms on the field that continuously attack opponents. Due to the expensive explosion of the elements, it is in dire need of a battery. |
 Xingqiu Xingqiu | Hydro
| One handed sword | Universal pocket dd. Supplements the damage dealer's hand with his own attacks, provides interruption resistance and reduces damage taken. Copes well with the role of a battery; on C2 it also cuts off Hydro resists. |
 Furina Furina | Hydro
| One handed sword | Depending on the Pneumusia mode, it can work as a healer and sub-deader. Her E-shka also deals damage, but more actively, and does not distract enemies. |
 Ye Lan Ye Lan | Hydro | Bow
| Mechanically similar to Xingqiu, but the damage depends on maximum health, so in packs with Hydro Resonance it gains an advantage. With a passive skill, it increases the damage of the active character during his ultimate. |
 Xiangling Xiangling | Pyro | A spear
| Deals area damage to Pyro. It can itself close the reaction of Steam or impose a status for the Hydro damage dealer. |
| Dendro | Catalyst | Stable Dendro applicator. The elemental skill lasts a long time on enemies, has a low cooldown and works at short intervals. Elemental Burst increases elemental mastery for the active character in the skill's area of effect. |
Sapports
Characters that buff damage dealers or focus on squad survivability.
| Character | Element | Weapon | Effects |
|---|---|---|---|
 Dione Dione | Cryo | Bow | Shieldman, healer, battery and elemental mastery buffer at the same time. Speeds up movement while under a shield and reduces stamina consumption. Applies a Cryo effect to enemies in the area of the elemental explosion, reducing their attack power. |
 Laila Laila | Cryo | One handed sword | Generates a strong permanent shield whose duration coincides with the cooldown period. Cryo applicator with ultimate and a good battery. |
 Qi qi Qi qi | Cryo | One handed sword | A powerful pocket healer that relies on attack power. Applies a Cryo effect to nearby enemies. |
 Kazuha Kazuha | Anemo | One handed sword | One of the best supports in the Steam, Melt, Charged and Freeze packs. By using an elemental ability, dispels statuses and increases the bonus of the elements that reacted. The ultimate absorbs one of the elements on enemies and continuously hits opponents. |
 Sucrose Sucrose | Anemo | Catalyst | An alternative to Kazuha that increases elemental mastery. Excellent grouping of enemies, consistently cutting off set resistances "Viridescent Venerer". The heroine's ultimate is also colored in the element it comes into contact with. |
 Cookies Cookies | electro | One handed sword | HP dependent healer. The skill continuously deals Electro damage in a small radius and heals the active character, and the superpower deals damage depending on maximum health. Passive skills increase the heroine’s damage and healing abilities depending on her elemental mastery. |
 Sarah Sarah | electro | Bow | Buffer depending on base attack power. By using an elemental skill, he receives a crow feather, which he can leave on the field with a targeted shot. The active character in the area of the feather explosion increases his attack power. Has a high elemental burst damage multiplier that deals area damage. Restores energy to allies using a passive talent. |
 Kokomi Kokomi | Hydro | Catalyst | A healer who plays at maximum health. Summons a familiar onto the field that inflicts the Wet status on enemies and heals allies in a small radius. In a pack with Hydro Resonance, it gains the advantage of additional health. One of the best drivers for sub-DD with skills that depend on attack speed and punches. |
 Bennett Bennett | Pyro | One handed sword | Hiller, basic attack buffer and Pyro battery. Universal and suitable for many teams where a buff to the attack power parameter and instant high healing are needed. At C6, the requirements for squad selection increase, since Pyro infusion can harm the gameplay features of some characters. |
 Thoma Thoma | Pyro | A spear | A shield warrior with skills that deal Pyro damage from the pocket. In the role of sub-dd, the potential is low, but the application is at a high level. |
 Zhongli Zhongli |  Geo Geo | A spear | Excellent Geo shield and debuffer. The duration of the generated shield is much longer than the cooldown of the ability, so squad members are always safe. Cuts resistance to all elements in a small radius, and with a superpower imposes the negative Petrification status on all enemies. |
 Bai Zhu Bai Zhu | Dendro | Catalyst | Dendro is a healer and shield warrior with an ultimate. This talent increases the damage of reactions with Dendro, so it is an excellent support for units with this element. |
 Citlali Citlali | Cryo |  Catalyst Catalyst | Suitable for a support role in teams with Pyro and Hydro heroes, but not the best option for a booster Mona due to her excessive Cryo status. |
 Mizuki Mizuki | Anemo |  Catalyst Catalyst | Although Mona doesn't have much Hydro status, she can act as an ally to Mizuki as a pocket buffer. |
Top Teams
In the buffer and sub-DD positions, Mona's functions differ only due to her builds, and the teams selected for these roles are the same. For the main-dd astrologer, a squad is selected for the Par reaction, since in other cases it deals much worse damage.
From the characters discussed above, you can make the following strong teams:
| Character 1 | Character 2 | Character 3 | Character 4 | Features |
|---|---|---|---|---|
| Ayaka |  Shen HeRosary Shen HeRosary |  Mona Mona |  Kazuha Kazuha Kokomi Kokomi | Team with permanent Freeze for Ayaka. The main dd is the source of persistent Cryo status, and the sub dd closes resonance for her, buffs her, or works as a battery. Mona, paired with a support in the last slot, applies and supports Hydro on opponents. |
| Ganyu |  VentiKazuha VentiKazuha | Mona |  Dione Dione Laila Laila Zhongli Zhongli | Squad with Ganyu as the main DD. Like the pack above, it is designed for Freezing, where Anemo support groups enemies, the astrologer applies Hydro, and in the last cell a shield for resistance to interruption and survivability. |
 Wriothesley Wriothesley | XingqiuYe Lan | Mona | DioneLaila | Freeze with a Cryo Catalyst at the heart of the team and two resonances. Duke plays from the normal attacks that Hydro sub-dd works with. Mona is an additional Hydro applicator and buffer from the ultimate. The shield protector closes the resonance and maintains the health of the main damage dealer at the required level. |
| Wriothesley | RosaryShen He | Mona |  Bennett Bennett | A unit suitable for instant devastating damage to a single target, such as a boss fight. The ultimates are selected in such a way as to maximally buff the damage of Risley’s superpower and destroy the enemy with one cast. |
| Mavuika |  Furina Furina | Mona |  ShilonenCitlali ShilonenCitlali | With two Hydro sub-DDs, Mavuika will be able to fully utilize her charged attacks and constantly hit with Par's reaction. Shilonen or Sitlali will help with the ultimate set and resistance cut, which will simultaneously cover the need for survivability. Mona both gives a buff from the ultimate and covers Hydro resonance. |
 Hu Tao Hu Tao | Kazuha | Mona | Zhongli | Popular Hu Tao pack. Kazuha clusters enemies and buffs elemental damage, Mona casts Hydro for the bulk of the battle, and Zhongli prevents enemy attacks from dealing damage. The astrologer's elemental explosion works in synergy with the main DPS ultimate. |
Hu Tao Yanfei Yanfei | XingqiuYe Lan | Mona | DioneLaila | Team with Pyro DD, working from Para. Hydro sub-dds in the second and third slots apply the Wet status, giving the main damage dealer the opportunity to close the reaction. Layla or Diona provide team survivability with shields. |
Yanfei Klee Klee | KazuhaSucrose | Mona | Bennett | A squad supporting the Pyro Catalyst. Mona performs the usual functions of a Hydro applicator, Kazuha or Sucrose groups enemies and dispels statuses. Bennett closes resonance, generates energy for ultimate damage control, heals and buffs attack power. |
 Tartaglia Tartaglia | Kazuha | Mona | Bennett | Command to accelerate the damage of Tartaglia's superpower. Kazuha increases elemental damage upon contact with Hydro, Mona inflicts the Omen status on the enemy, and Bennett buffs attack power. Childe uses all of his buffs to attack in a close stance. |
| Mona | Xiangling | KazuhaSucrose | Bennett | Command for Mona's main dd, relying on Par. Xiangling is the source of massive Pyro status, Anemo support pulls enemies and spreads this status, Bennett closes resonance and generates energy for the sub-dead super ability. The advantage of Sucrose in the team is additional units of elemental mastery. |
 Nile Nile | Mona |  Nahida Nahida Collei Collei |  Yao Yao Yao Yao Bai Zhu Bai Zhu | Team from Budding with Nilu. Mona closes Hydro Resonance and increases the damage from the explosion of Dendro Cores. Nahida buffs the elemental mastery of the entire squad and hits from the pocket, but she can be replaced with Kollei if desired. Dendro healer ensures the survival of the squad. |
 Tignari Tignari | Mona |  Fischl Fischl Yae Miko Yae Miko | Cookies Dory Dory | Team from Stimulation with Dendro damage dealer. Thanks to Electro Resonance, there will be no energy problems with reactions. Mona in such a squad is better to collect in a set InstructorAs Attack Power not particularly in demand for these damage dealers. |
| Mizuki |  Mona Mona | Fischl |  Lisa Lisa | Hydro-Electro team, where the main damage is done by Electro damage dealers. Mona doesn't have much status, she is more needed for buff and distraction of enemies. Mizuki plays on the field and inflates the elements. |
| CynoYae MikoClorinda | Fischl Beidou Beidou |  Mona Mona |  KiraraBai Zhu KiraraBai Zhu | Team with Electro damage dealer. Since Mona has a small amount of Hydro status, you should not count on a large number of Dendro cores from Budding and additional damage during Vegetation. However, the buff from Omen is extremely useful and will have a positive effect on the team’s damage. |
 Eola Eola Freminet Freminet | Mona |  Mika Mika Bennett Bennett Yun Jin Yun Jin | CookiesDory | Team with physical a damage dealer in the role of a hyper-carry, in whose buffs the entire team invests. Eola/Fremine deal the main damage, Mona strengthens them with her ult and book Dragon Slayer Epic. Either Mika or Bennett is ideal as a second buffer, if he does not have C6 activated, you can also take Yun Jin. The fourth slot is occupied by an Electro healer to carry out the Stimulation reaction. |
| Mona |  Keia Keia | Xiangling |  Barbara Barbara | F2P squad for beginners with main dd astrologer. The team selected pocket damage dealers with similar mechanics: ultimates damage opponents in a certain radius around the main damage dealer. Hydro Resonance allows Barbara to heal better, but she can swap with a Shielder or another available healer. |
How to play Mona

Mona has flexible gameplay, so she can perform many functions and take different positions. A damage-focused build allows her to lead the team, deal damage from the pocket, or become a procaster with her ultimate. The heroine performs well in combination with the instant damage of some main damage dealers, multiplying it with personal damage.
The Buffer Astrologer's options are more limited, but do not fundamentally change the gameplay: she is still on the team due to the need for Hydro and Omen status. The units in which Mona is useful do not depend on her build, so the sequence of activation of skills does not change.
Rotation
Approximate rotation when playing as Mona:
- Use the defensive skills of your supports - apply healing or generate a shield.
- Activate your pocket damage control skills in order of duration and summon Phantom Mona to the field. Dispel statuses on enemies if the team has Anemo support.
- If your squad has heroes with destructive area damage, apply buffs first, then Mona’s superpower. Try to immediately deal damage to the team's main DD, since Omen's effect lasts only 4 seconds.
- Use your main damage dealer's attacks while your sub-damage and defensive skills are active.
- Monitor the energy of your ultimates and repeat the rotation on cooldown.
Сonclusion

Mona is a Hydro Catalyst with fast-paced yet uncomplicated gameplay. Endowed with high damage potential due to the damage multipliers of her abilities, she copes well with Hydro's application and distracts opponents with her skill. With an explosion of elements, it traps enemies in bubbles, preventing the movement of small monsters, and also imposes the negative Omen status to buff the damage of allies.
Mona's key feature is that she has an alternative build that is much easier to assemble. Doesn't lose effectiveness without constellations and plays great with free weapons. Endowed with a number of skills that are relevant at the beginning of the game, at later stages and in high-level Twisted Abyss. Also rightfully considered one of the best characters in the standard banner and consistently ranks high in dash list.
We hope we helped you put together the best build for Mona in Genshin Impact. stay tuned builds on our site to effectively use each character and easily complete any content. You can also read in a separate article best squad builds.
Questions and answers about Monet
Who is Mona?
Mona is the 5⭐ playable Hydro character in Genshin Impact. An astrologer who writes articles for the Steam Bird newspaper.
When was Mona added to the game?
Mona has been a playable character since the release in patch 1.0.
Who voices Mona?
English voice actor – Felecia Angelle. The Japanese voice actor is Konomi Kohara. The Chinese voice actor is Chen Tingting. Korean voice actor: Woo Jeong-sin.
Which group does Mona belong to?
Mona belongs to the Mondstadt group.
When is Mona's birthday?
31 August.
What is Mona's zodiac sign?
Virgo.
How old is Monet?
Mona's age is 18-19 years old.
How tall is Mona?
Mona's height is approximately 158-163 cm.
Where is Mona from?
Mona is from the area near the Port of Thorns in Mondstadt and currently lives in the capital.
What is Mona's element?
Hydro.
Where is Mona's Eye of God?
Mona's Eye of God is located on her back under the collar of her cape.
What is the name of the constellation Mona?
Crimson Dawn.
What is Mona's character like?
Mona is straightforward and not known for her delicacy. She is also smart and determined.
What does Mona like?
Mona loves astrology very much.
When will Mona arrive?
Mona can be obtained randomly from a standard banner or after losing in an event.
What to download Monet?
Mona needs to pump up an explosion of elements and an elemental skill, giving priority to her ultimate.
What artifacts are best to put on Mona?
Mona needs the Emblem of Shattered Fate or Millelith's Fortitude set.
What is Mona's signature weapon?
Mona doesn't have a sign.
Which weapon is best for Mona?
The best options for Mona are Celestial Atlas, The Widsith, and Epic of the Dragonslayers.
How many Philanemo mushrooms does Mona need?
168 pieces.
How much hero experience is needed for level 90 Mona?
421 hero experience.
In what order should you use Bennett and Mona?
First you need to use Bennett's ultimate, then Mona's.
What does C1 Mona do?
The first constellation of Mona increases the damage of Hydro reactions to an enemy who has the Omen status.
How to pop Mona's bubble?
In order for the bubble from Mona's ult to burst, you need to deal damage to it.
How to deal high damage to Mona?
In order for Mona to cause a lot of damage from her ult, you need to do the following: apply Hydro status to Mona, which then needs to be dispelled by Sucrose with Viridescent Venerer; switch to Bennett and activate his ult; return to Mona and use an elemental explosion, then stand for 2 seconds; go to Bennett and explode his ult with his elemental skill.
What is Mona's last name?
Mona's last name, Megistus, was given to her by her mentor.
Who is Mona's teacher?
Mona's teacher is the witch Barbelot, an astrologer who knows hydromancy and is a member of the Witches' Sabbath. Mona herself calls her "old woman."
What does Mona's full name mean?
Mona's full name is Astrologer Mona Megistus. According to her, it means "the great astrologer Mona."
What is Mona's job?
Mona is an astrologer and also earns money by writing articles for the Steam Bird newspaper.
Why Mona from Fontaine?
Mona writes an astrology column for the Fontaine newspaper, The Steam Bird. The theory of her Fontaine origins was popular due to the girl's clothing until it was debunked in the Masquerade of the Guilty quest.
Where does Mona live?
Mona lives in Mondstadt on the edge of the city, where Paimon and the Traveler helped her settle.
How are Mona and Klee related?
Mona's teacher assigned her a case in Mondstadt related to Alice's successor, who turned out to be Klee.
Why doesn't Mona have money?
Mona believes that to be successful you need to live a simple life. She spends all her money on research in astrology, but does not earn money from fortune telling.
Where can you meet Mona?
You won't be able to meet Mona in the open world. If you need to find Mona for the “Must - Return” quest, then there are only three options for searching for the astrologer: in the library, in “The Good Hunter” and at Katerina’s.
How to get to Mona's house?
Mona's house can only be opened through her legend quest "The Crimson Dawn". It is currently impossible to get inside her house, but it was possible to enter during the Summertime Odyssey event.
How are Mona and Fischl related?
Mona and Fischl are friends.
Why are they shipping Mona and Scaramuccia?
Scaramuccia and Mona met in the very first game event, Unreconciled Stars, in which Mona saved the Traveler from the Harbinger of Fatui.