 Detailed guide to Yae Miko in Genshin impact with the nuances of choosing weapons, artifacts and squad members. An overview of talents, passive skills and constellations. Basics of the game and optimal rotation. Everything Yae Miko needs to level up.
Yae Miko is the High Priestess of the Narukami Great Shrine, a descendant of the Kitsune family, Electro Archon's familiar, and editor-in-chief of the Yae Publishing House. Players are introduced as a ⭐️⭐️⭐️⭐️⭐️ Electro character that wields a catalyst. The heroine has powerful damage, is able to play the role of both the main damage dealer and the secondary damage dealer with huge burst damage. Naturally, like any Burstovik, she will confidently take her place in revolver groups.
| Rating | S-position in dash list |
| Rarity | ⭐️⭐️⭐️⭐️⭐️ |
| when added to the game | February 16, 2022 (patch 2.7) |
| How to get a character | Prayer "Purple of Eternal Blossoms" |
| Element | Electro⚡️ |
| Weapon | Catalyst |
| Gender of the character | Female |
| To which group does |
|
| constellation name | Divine Kitsune |
| Home region | Inazuma |
| Birthday | 27 June |
| Zodiac sign | Cancer |
| Age of Yae Miko | more than 500 years |
| Height of Yae Miko | 170-175 cm |
| Yae Miko special dish | Udon Kitsune |
| Voice actresses |
|
How to get Yae Miko in Genshin Impact
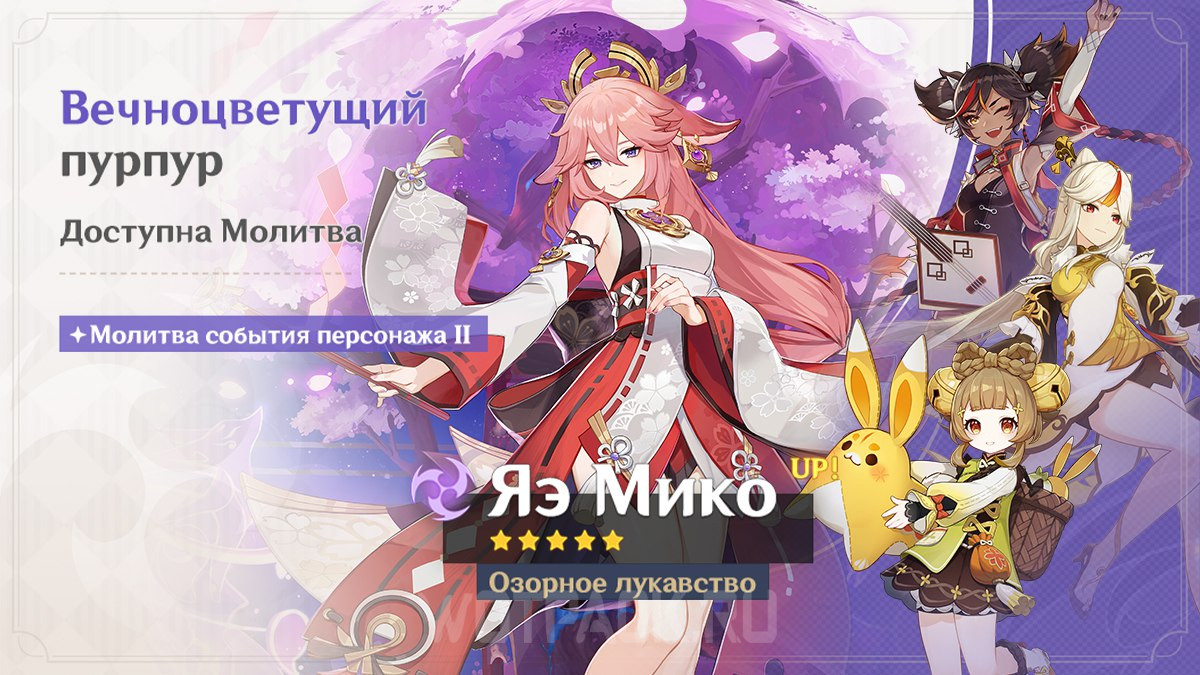
Yae Miko can be obtained from the "Character Event Prayer" event banner, which will take place with February 21 to March 12, in second half updates 4.4. To open constellations for the heroine, you need to knock out her copies.
For the schedule of the release of new characters and reruns, follow timetable banners.
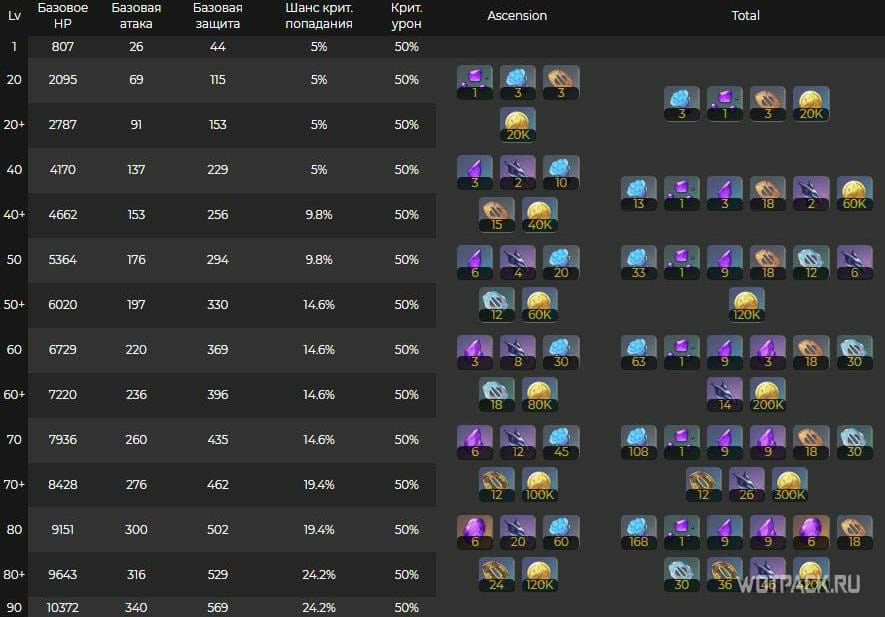
Yae Miko Characteristics: What Increases When Ascended
Main stat of Yae Miko - crit chance. hits. Along with the pumping of the character, health indicators also increase, attack power и of protection. The specific values of the characteristics can be found in the table.
| Level of | Base HP | Basic Attack | Basic protection | Crit chance. hits |
|---|---|---|---|---|
| 1 | 807 | 26 | 44 | — |
| 20 | 2095 | 69 | 115 | — |
| 40 | 4170 | 137 | 229 | 4.8% |
| 50 | 5364 | 176 | 294 | 9.6% |
| 60 | 6729 | 220 | 369 | 9.6% |
| 70 | 7936 | 260 | 435 | 14.4% |
| 80 | 9151 | 300 | 502 | 19.2% |
| 90 | 10372 | 340 | 569 | 19.2% |
Yae Miko's abilities
Yae Miko owns a catalyst, so by definition she doesn't have much variability in elements, and all of her active skills, without exception, deal Electro damage. And if normal attacks are interesting only because of the high base indicators, then the elemental skill and elemental explosion have a huge damage potential.
In this paragraph, we will analyze in detail how the skills of Yae Miko work, and in what order it is better to pump them. In addition, all constellations will be considered, and a list of consts will be presented, which are the most beneficial and optimal for obtaining in terms of increasing efficiency.
Basic skills (active skills)
- sin-eating kitsune (Normal/Charged/Drop Attack)
Performs a series of up to three attacks with a normal attack that deals Electro damage. On a charged strike, casts a short spell, attacking with electricity in an area.
While falling, attacks all enemies in the path, and also deals Electro damage in an area at the landing point.
- Yakan Curse: Sakura Sesse (Elemental Skill)
Cooldown: 4 sec.
Duration: 14 sec.
Moves quickly for a short distance, leaving behind a branch of sakura (up to 3 pieces).
sakura branch:
- deals Electro damage to nearby enemies;
- each additional sakura on the battlefield increases the damage of all sakura.
If a branch is placed too close to an existing one, the latter will collapse.
An excellent movement skill and passive damage in one bottle. Empowered by constellations, and has immediate synergy with elemental blast. This skill alone allows you to play the role of a secondary damage dealer.
- Greater Secret Art: Tenko Kenshin (Elemental Explosion)
Cooldown: 22 sec.
Energy consumption: 90
When activated, it destroys all branches of Sakura and deals large Electro damage in an area. Each Sakura sessho destroyed in this way yields one Lightning Kitsune of the Sky.
The order of pumping
Miko's main damage comes from her elemental skill and elemental explosion. She uses normal attacks only in some builds, although they do not increase DPS much due to the long animation. It is recommended to set the priority of pumping abilities as follows:
- Elemental skill (9-10 lvl).
- Ulta (9-10 lvl).
- Normal attacks for sap-dd (1-6 lvl). If the main DD is 8-9 lvl.
Passive skills
| Talent | When does it open | What gives |
|---|---|---|
| Yako Meditation | Base | Create Talent Up Materials: 25% chance to drop an additional material of the same region and rarity as the original material. |
| The Shrine’s Sacred Shade | 2nd Ascension Phase | Each sakura branch destroyed by Yae's elemental explosion returns one charge of her elemental skill. |
| Enlightened Blessing | 4nd Ascension Phase | Each point of Yae Miko's Elemental Mastery increases the damage of Cherry Boughs by 0,15%. |
Constellations
Recommended constellations for Yae Miko: C1, C2 и С6:
- Feature first constellation: almost completely solves the problem with the expensive ultimate, since it allows you to restore 8 units of energy immediately after its activation with each hit of Sakura.
- Feature second constellation: enhances the elemental skill by the fact that totems are created immediately of the 2nd level and the total number of lvls increases to 4. Sakura's damage radius also increases.
- Feature sixth constellation: Significantly increases the Priestess's damage, as the E-Sheka now ignores 60% of the defense of enemy targets.
| number | Name | <font><font>Materials</font></font> |
|---|---|---|
| 1 | Yakan Offering | Each time an Elemental Explosion Lightning strikes, Yae Miko heals himself for 8 damage. energy. |
| 2 | Fox's Mooncall | Sakura branches are created starting at level 2. The maximum level is 4th (3 stacks). Sakura's range has also been increased by 60%. |
| 3 | The Seven Glamours | Increases elemental skill level by 3. Max. Lvl: 15 |
| 4 | Sakura Channeling | When a Sakura Branch deals damage to an enemy, all characters gain +20% Electro Damage Bonus. |
| 5 | Mischievous Teasing | Increases elemental explosion level by 3. Max. Lvl: 15 |
| 6 | Forbidden Art: Daisesshou | Attacks Sakur sesse (elemental skill) Ignore 60% of enemy defense. |
Advantages and disadvantages of Yae Miko

Yae Miko is an Electro character with huge explosive damage, which can be in the position of the main damage dealer and the secondary damage dealer. However, like other heroes, it has certain "pros" and "cons".
| Advantages | Disadvantages |
| Continuous infusion opens the possibility for a stable induction of reactions. | High energy costs for the explosion of the elements. Yae Miko has one of the highest ult cost - 90 units. Therefore, for a comfortable game, she needs one more Electro in the team, which will act as a battery (energy source) or a weapon from the Favonia series. |
| A high base attack power makes it much easier to overclock the damage, since even with minimal investment, the priestess can contribute quite good DPS. | The biggest problem for a character as a main damage dealer can be the long animation of normal attacks, which can reduce the overall DPS. |
| Plays great through Dendro reactions, in particular, Exacerbation, Growth and Vegetation. In such commands, it can act both as a reactor (close the reaction) and as an applicator (impose a status). | To get the maximum damage from the explosion of the elements, it is necessary that all the totems are active, and this requires the correct placement and maintaining the distance between them. |
| Charged hits have not only a unique animation, but also increased AoE damage. | The lack of interrupt resistance and increased stamina costs make positioning more important, which makes the gameplay somewhat more difficult. |
| Huge burst damage from the ultimate, which is additionally increased if there are already 3 elemental skill totems on the battlefield. | |
| The elemental skill deals damage even when the character is not on the battlefield and has a fast cooldown (4 seconds). |
Leveling Yae Miko
Let's take a closer look at what Yae Miko needs to level up, including the materials and components that are used in the process of increasing the level of talents and character promotion.
Elevation
To raise Yae Miko to the maximum level, the following materials and components will be required:
- Shards, fragments, pieces and precious Vajrad stones - can be obtained from world bosses: Electro Hypostasis, Thunder Manifestation, Flock of vishaps of the depths, Electro Regisvine и Primo Geovishap. Alternative way: converting other stones on the workbench with Nitrogen dust.
- Guards (old, kageuchi and famous) - resource for killing opponents in Inazuma: Kairagi и Nobushi.
- Sea Ganoderma - a curiosity of Inazuma that grows in sea areas or on islands.
- Depth Dragon False Fin - World Boss Resource Flock of vishaps of the depths in location Encanomy.
- 420.000 Mora and 421 hero experience.
Talents
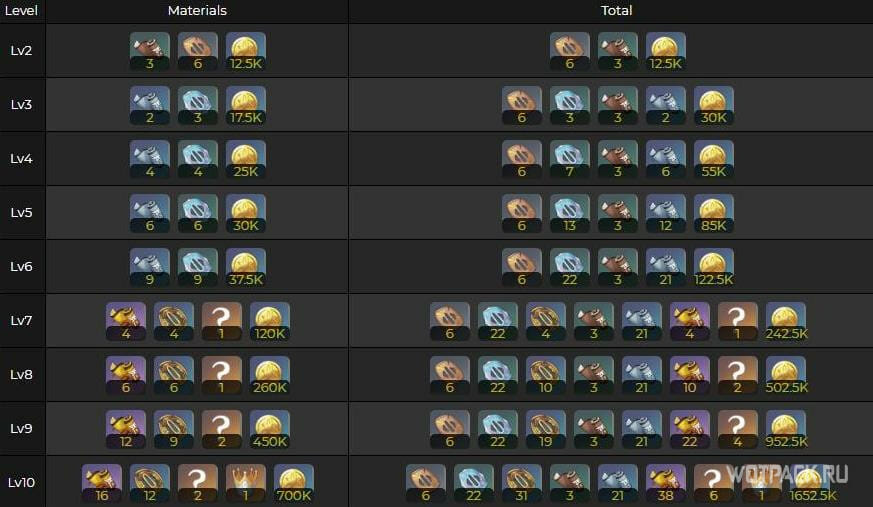
To raise the talent level of Yae Miko, you also need Guards and the following materials:
- Teachings, Directions, and Philosophy on "Light" - Talent Books from the Dungeon of Mastery Violet Court. Farming on Wednesday, Saturday and Sunday.
- The Meaning of Aeons - Weekly Boss Material Magatsu mitake Narukami no mikoto.
- Crown of Insight - an item to increase the level 10 talents.
- 1.653.000 Mora.
You can calculate the amount of missing materials using Genshin Impact Calculator.
Best Yae Miko builds in Genshin Impact

The main purpose of the high priestess is dealing damage. It does not matter if she occupies the position of the main damage dealer, secondary damage dealer, or a burster in the revolver group - the emphasis must be on damage. The priority of certain characteristics is only affected by what reactions Miko plays through. For example, for Vegetation mastery of the elements more important than crits, and for Escalation they already matter Attack Power и critical damage.
In the assembly of Yae Miko, it is necessary to build on which team she plays in and what role she plays. At the same time, one cannot ignore the expensive explosion of the elements, which is why in any build it becomes a priority energy recovery. Even if you have C1 or "batteries", you should not underestimate this stat, as the stable use of the ult guarantees high DPS.
Recommended characteristic values
Let's consider what characteristics you need to pump in order to collect the best builds of Yae Miko.
Main DD
Being the basis of the group, needs a lot of crits и attack power, which should balance with elemental mastery and energy recovery. This type of formation is suitable, including for units playing through the Stimulation reaction, where crits and attack are of no small importance.
| Artifact | Main characteristic | Additional stats |
|---|---|---|
 Flower of Life Flower of Life | HP (permanent) | Crete. damage Crit chance. hits Elemental Mastery Attack Power % / Energy Recovery % |
 Feather of Death Feather of Death | Attack Power (Permanent) | Crete. damage Crit chance. hits Attack Power % / Energy Recovery % Elemental Mastery |
 The sands of Time The sands of Time | Attack Power % | Crete. damage Crit chance. hits Attack Power % / Elemental Mastery Energy Recovery % |
 space cup space cup | Bonus Electro Damage % | Crete. damage Crit chance. hits Elemental Mastery / Attack Power % Energy Recovery % |
 Crown of Mind Crown of Mind | Crete. damage / Crit Chance. hits | Crete. damage / Crit Chance. hits Attack Power % Energy Recovery % Elemental Mastery |
Optimal characteristic values:
- ATK: from 2000 units and above.
- Elemental Mastery: from 100-150 units. In addition to increasing the damage from reactions, MC affects the damage of the elemental skill.
- Chance of crit and crit. damage: Ratio 1:2 (60 Ksh and 120 KU) or higher.
- Energy recovery: from 140% (with the second Electro character in the squad) and 170% (without the second Electro).
Secondary DD (burst)
In this case, the emphasis is on increasing energy recovery. Then, depending on who closes the reaction, the required amount is selected mastery of the elements. In part, even in this case, crits and attack power are not superfluous, for example, everyone is on the same team with Dendro through Stimulation. In other cases, MS is a priority.
| Artifact | Main characteristic | Additional stats |
|---|---|---|
| Flower of Life | HP (permanent) | Energy Recovery % Attack Power % Elemental Mastery Crete. damage / Crit Chance. hits |
| Feather of Death | Attack Power (Permanent) | Attack Power % Energy Recovery % Elemental Mastery Crete. damage / Crit Chance. hits |
| The sands of Time | Attack Power % / Energy Recovery % | Attack Power % / Elemental Mastery Energy Recovery % Crete. damage Crit chance. hits |
| space cup | Bonus Electro Damage % | Elemental Mastery / Attack Power % Energy Recovery % Crete. damage Crit chance. hits |
| Crown of Mind | Crete. damage / Crit Chance. hits | Attack Power % Elemental Mastery Energy Recovery % Crete. damage / Crit Chance. hits |
Optimal characteristic values:
- ATK: from 1500 units and above.
- Elemental Mastery: from 200-300 units.
- Chance of crit and crit. damage: Ratio 1:2 (50 Ksh and 100 KU) or higher.
- Energy recovery: from 160% (if there is another Electro character in the group) and 200%+ (if Miko is the only Electro).
Best weapon
Choosing a catalyst, you need to build on the selected build:
- For the main DD, you need books that give crits, attack power, increased damage. In this case, the Yae Miko signature would be ideal - Kagura's Verity, although it is quite versatile and will suit any build.
- Secondary DD requires books with Energy Recovery, Elemental Mastery, and Attack Power.
The following are the most suitable weapons for Yae Miko.
Main DD
As the basis of the group, it can use the following catalysts:
| Name | Description | Recommendation |
|---|---|---|
 Kagura's Verity Kagura's Verity⭐️⭐️⭐️⭐️⭐️ Base damage: 46-608 Crete. damage 14,4%-66,2% | When using an elemental skill, increases its damage by 12%-24% for 16 seconds. Stacks up to 3 times. At 3 stacks, gives a bonus elemental damage 12%-24%. | Yae Miko's signature weapon and the strongest variant. Increases the damage of an elemental skill, stacking three times, which creates perfect synergy with totems. For this reason, the elemental damage bonus is also guaranteed, and no conditions need to be met - just use the skill, placing all 3 Sakura. |
 Skyward Atlas Skyward Atlas⭐️⭐️⭐️⭐️⭐️ Base damage: 48-674 Attack Power: 7,2%-33,1% | Gives a bonus elemental damage 12%-24%. Once every 30 sec. has a 50% chance on a normal attack to summon clouds that attack nearby enemies, dealing 160-320% attacks. | Since Yae Miko can't use buffs for long due to the lack of a snapshot mechanic, a large amount of attack power is extremely valuable. With or without a second passive, it is generally a top 2 weapon. |
 Memory of dust Memory of dust⭐️⭐️⭐️⭐️⭐️ Base damage: 46-608 Attack Power: 10,8%-49,6% | Increases shield strength by 20%-40%. On hit, increases attack power by 4%-8% within 8 sec. The effect can stack up to 5 times and occur every 0.3 seconds. In addition, while protected by a shield, the attack power bonus of this effect is increased by 100%. | Similar to the Celestial Atlas in its functionality, as it is also a weapon that provides a high increase in attack. However, due to the fact that he cannot stack off the field, in most cases it turns out to be a little worse. It also requires a shield for the passive effect to work. |
 Lost Prayer to the Sacred Winds Lost Prayer to the Sacred Winds⭐️⭐️⭐️⭐️⭐️ Base damage: 46-608 Crit Chance: 7,2%-33,1% | Increases movement speed by 10%. While the character is on the field every 4 seconds. increases the elemental damage bonus by 8%-16% (max. 4 stacks). Levels are reset if the character leaves the battlefield. | Even if the Catalyst is used to deal damage, getting all the stacks is next to impossible since Miko hasn't been on the battlefield for that long anyway. But despite this, Prayer is a great option, since 2 levels is enough. |
 Eye of Oath Eye of Oath⭐️⭐️⭐️⭐️ Base damage: 44-565 Attack Power: 6-27,6% | Using an elemental skill increases energy recovery by 24%-48% within 10 sec. | The best free catalyst that provides bonuses to energy recovery and attack power, while having almost no conditions. The elemental skill is used quite often and the cooldown is only 4 seconds, so the EP bonus can be maintained consistently. |
 The Widsith The Widsith⭐️⭐️⭐️⭐️ Base damage: 42-510 Crete. damage: 12%-55,1% | When switching to a character for 10 seconds. a random theme song plays. Can occur once every 30 seconds. Recitative: Increases attack power by 60%~120%; Aria: Increases elemental damage by 48%~96%; Interlude: Increases Elemental Mastery by 240~480. | Considered a very strong catalyst for any major DD. Despite the randomness of the buffs, depending on the playstyle, all of its effects will be useful in one way or another. |
 Song of the Vast Blue Song of the Vast Blue⭐️⭐️⭐️⭐️ Basic attack: 44-565 Energy recovery: 6.7%-30.6% | Within 6 sec. After hitting an enemy with a normal or charged attack, the damage of the normal attack will increase by 8-16%, and the damage of a charged attack is by 6-12%. The effect can stack up to 3 times and occurs once every 0,3 sec. | Restoring energy from a catalyst will not be superfluous given the high cost of an elemental explosion of 90 units. The weapon also increases all hand damage while the heroine is attacking. |
 The sparkle of clear waters The sparkle of clear waters⭐️⭐️⭐️⭐️ Basic attack: 44-565 Attack Power: 6%-27,6% | Activating an elemental skill increases the damage bonus of all elements by 8-16% for 15 sec. and imposes Life Debt equal to 24% of max. HP. The effect can occur once every 10 seconds. When Life Debt is removed, bonus damage with all elements for 15 sec. increases by 2-4% for every 1000 units given. Life Debt HP. The all-element damage bonus gained this way cannot exceed 12-24%. | Suitable for the role of driver when Yae spends a lot of time on the field. The only requirement will be the presence of a healer in the squad, since the catalyst consumes health. |
 Sun pearl Sun pearl⭐️⭐️⭐️⭐️ Base damage: 42-510 Crit Chance: 6%-27,6% | If the hero hits the enemy with a charged or normal attack, the damage of the ultimate and elemental skill is increased by 20%-40% within 6 seconds. Hits by an elemental explosion and E-shka, on the contrary, increase the damage from normal attacks by the same values for 6 seconds. | Another strong 4-star weapon. In the case of the role of a damage dealer, it becomes much more valuable, since both parts of the passive effect almost always remain active, increasing all damage dealt. |
 Montenegrin agate Montenegrin agate⭐️⭐️⭐️⭐️ Base damage: 42-510 Crete. damage: 12%-55,1% | When killing enemies, increases attack power by 12%~24% up to a maximum of 3 stacks. The effect lasts 30 seconds. | At R5 and at 3 stacks it becomes a very powerful weapon that can compete with many 5 star books. The problem is only in the stacks - it is not always possible to collect them. |
 Eye of Perception Eye of Perception⭐️⭐️⭐️⭐️ Base damage: 41-454 Attack Power: 12%-55,1% | On hit with a Light or Charged Attack, there is a 50% chance to launch an Eye of Mind that deals 240%~360% attack power damage. It can bounce from enemy to enemy up to 4 times. May occur once per 12~8 sec. | Not the strongest option. But if all of the above weapons are missing, you can use it as an alternative. |
Secondary DD (burst)
One of the following weapons can be equipped for a support position with damage outside of the battlefield:
| Name | Description | Recommendation |
|---|---|---|
| Kagura's Verity ⭐️⭐️⭐️⭐️⭐️ Base damage: 46-608 Crete. damage 14,4%-66,2% | When using an elemental skill, increases its damage by 12%.~24% for 16 seconds. Stacks up to 3 times. At 3 stacks, grants a 12%~24% elemental damage bonus. | Signature Catalyst is great for sub-DPS as well. Good base, crit. damage, passive effect decently accelerates the elemental skill and the elemental damage bonus. |
| Skyward Atlas ⭐️⭐️⭐️⭐️⭐️ Base damage: 48-674 Attack Power: 7,2%-33,1% | Gives a bonus elemental damage 12%-24%. Once every 30 sec. Has a 50% chance on a normal attack to summon clouds that attack nearby enemies. | Huge basic attack. Unconditional elemental damage bonus. Despite the fact that the second half of the passive is more suitable for the role of the main damage dealer, the weapon still remains quite relevant due to the main stats and buff. |
 Dreams of a thousand nights Dreams of a thousand nights⭐️⭐️⭐️⭐️⭐️ Basic Attack 44-542 Elemental Mastery 58-265 |
| The best catalyst in the game from reactions for the sup-dd role. Gives a huge boost to Elemental Mastery and at the same time increases elemental damage. In addition, buffs MC to allies constantly and without any requirements, which will increase the overall DPS of the entire squad. |
| Eye of Oath ⭐️⭐️⭐️⭐️ Base damage: 44-565 Attack Power: 6-27,6% | Using an elemental skill increases energy recovery by 24%-48% within 10 sec. | The optimal F2P option, which will provide both attack and energy recovery in an acceptable amount, which will allow artifacts to place more emphasis on, for example, elemental mastery or other stats. |
| Sun pearl ⭐️⭐️⭐️⭐️ Base damage: 42-510 Crit Chance: 6%-27,6% | If the hero hits the enemy with a charged or normal attack, the damage of the ultimate and elemental skill is increased by 20%-40% within 6 seconds. Hits by an elemental explosion and E-shka, on the contrary, increase the damage from normal attacks by the same values for 6 seconds. | Given that Yae is able to cancel her normal attack with e. skill, she can effectively use her passive even as a secondary damage dealer. |
 fruit of replenishment fruit of replenishment⭐️⭐️⭐️⭐️ Base damage: 42-510 Energy recovery: 10%-45,9% | When triggering an elemental reaction, a Growth and Decline buff appears, which increases mastery of the elements on 24-36 units, but reduces attack power by 5%. The effect stacks up to 5 times. The counter works no more than 1 time in 0,3 seconds. If no elemental reactions are triggered within 6 seconds, 1 level of the buff is lost. The effect works even if the character with the catalyst is not on the battlefield. | Craft catalyst from Sumeru. Gives a lot of energy recovery and mastery of the elements, thanks to which it will complement the squad well through reactions. It is best used in Dendro units, particularly through Vegetation, where Elemental Mastery directly affects damage. In Stimulation, it will also be good, but in this case, crits and attack power are also important, which the weapon cannot give. |
 Ring of Hakushin Ring of Hakushin⭐️⭐️⭐️⭐️ Base damage: 44-565 Energy recovery: 6,7%-30,6% | When a Hero equipped with the Ring triggers the Electro Reaction, all allies with at least one element of this reaction gain 10%-20% bonus to your elemental damage for 6 seconds. These buffs do not stack. | The catalyst is extremely situational and only works in units through elemental reactions. However, it does its job quite well and increases the elemental damage of the characters that participate in these reactions. Suitable for sup-dd Yae and will show itself well in revolver units. |
 Nautical atlas Nautical atlas⭐️⭐️⭐️⭐️ Base damage: 44-565 Elemental Mastery: 24-110 | Within 10 sec. after invoking an elemental reaction, increases the Elemental Damage bonus by 8%-16%. Can stack up to 2 times. | Quite a good crafting weapon, subject to the game from reactions. It will go well with Dendro if the heroine acts as a reactor, for example, in squads through Aggravation or Vegetation. |
 Codex Favonia Codex Favonia⭐️⭐️⭐️⭐️ Base damage: 42-510 Energy recovery: 10-45,9%. | Critical attacks with a chance of 60-100% can summon elemental particles that replenish 6 units of energy. Appear every 12-6 seconds. The time and probability of occurrence depends on the awakening rank. | Despite the lack of damage bonuses, in teams where a lot of energy is needed, weapons can be a great option. For example, for characters like Beidou, the weapon will allow for a softening of the energy regeneration requirements, which can provide an overall increase in team DPS. |
 The Vigil of the Caller to the Stars The Vigil of the Caller to the Stars⭐⭐⭐⭐⭐ Basic attack: 44-542 Elemental Mastery: 58-265 | Increases Elemental Mastery by 100-200 unit When the wearer creates a shield, once every 14 sec. the Mirror of Night effect is activated for 15 sec.: the active character's damage is increased by 28%-56%. | The weapon won't give Yae Miko anything other than 365 Elemental Mastery, but if there are no other alternatives, it's worth putting in. |
Best Artifacts
Choosing artifacts for Yae Miko, it is worth starting not so much from her role, but from the reactions through which she plays.
| Name | Effects | Recommendation |
|---|---|---|
 Emblem of Severed Fate Emblem of Severed Fate⭐️⭐️⭐️⭐️ ⭐️⭐️⭐️⭐️⭐️ | 2 parts: Energy recovery +20% 4 parts: Increases elemental explosion damage by an amount equal to 25% of the amount of energy regeneration. The effect can be increased to a maximum of 75%. | The 2-piece bonus will increase energy recovery, which will be useful for an expensive ult. At the same time, a full set will give a very large increase in elemental explosion damage if there is a good EP indicator. Potentially the strongest set. |
 Thundering Fury Thundering Fury⭐️⭐️⭐️⭐️ ⭐️⭐️⭐️⭐️⭐️ | 2 parts: Electro Damage +15%. 4 parts: Increases the damage of the Overload, Charged, Superconductor, and Vegetation reactions by 40%. Aggravate reaction damage is increased by 20%. Activating any of these reactions reduces the cooldown of an elemental skill by 1 second. The effect triggers every 0,8 seconds. | Universal set for any Electro character. Grants a permanent elemental damage bonus and increases damage from all reactions that involve electricity. At the same time, the interaction between the elements activates an effect that reduces the cooldown of the skill. |
 Gilded Dreams Gilded Dreams⭐️⭐️⭐️⭐️ ⭐️⭐️⭐️⭐️⭐️ | 2 parts: Elemental Mastery +80 points. 4 parts: After calling the elemental reaction, the character receives a buff for 8 seconds. For each hero of their element in the squad, they get 14% attack power, and for each owner of a different element - 50 elemental mastery points. The effect works no more than once every 1 seconds and can appear even if the owner of the set is not on the battlefield. | In a team playing from Dendro reaction, especially from Vegetation, this set is the best choice. Since in this case the damage is scaled from elemental mastery, and Yae will be able to cause reactions without problems, even without being on the battlefield. |
 golden troupe golden troupe⭐️⭐️⭐️⭐️ ⭐️⭐️⭐️⭐️⭐️ | 2 parts: Increases elemental skill damage by 20%. 4 parts: Increases elemental skill damage by 25%. In addition, when the character is not on the battlefield, the damage of the elemental skill is additionally increased by 25%. After 2 sec. after entering the battle, the effect disappears. | A powerful set for pocket DD, buffing skill damage. All gains can only be obtained from a pocket, so not recommended for a driver. |
 Paradise lost flower Paradise lost flower⭐️⭐️⭐️⭐️ ⭐️⭐️⭐️⭐️⭐️ | 2 parts: Elemental Mastery +80 points. 4 parts: Increases the damage dealt by Budding, Vegetation, and Bloom by 40% on the character equipped with this set. If the carrier causes these reactions on its own, the effect will increase by another 25%. Each summation lasts 10 seconds. The effect stacks up to 4 times, occurs once every 1 seconds, and activates even if the character is not active. | At the same time a strong, but at the same time specific set. Increases projectile damage in the build through Vegetation, but focuses solely on this reaction. This means focusing on elemental mastery or having two complete sets, changing them to suit different situations. Yae can play through Vegetation, but doesn't rule out other builds, while a set makes her narrowly focused. |
 Calming thunder Calming thunder⭐️⭐️⭐️⭐️ ⭐️⭐️⭐️⭐️⭐️ | 2 parts: Electrical resistance +40%. 4 parts: Increases damage against enemies affected by Electro by 35%. | The situation is similar to the Flower of Paradise Lost - the set is situational, but in certain situations it boosts DPS quite a lot. It can be used both in squads through Stimulation and in mono-Electro. Equipping the full set is a must. |
| Thundering Fury / Itinerant ensemble / Gilded Dreams / Paradise lost flower ⭐️⭐️⭐️⭐️ ⭐️⭐️⭐️⭐️⭐️ | 2 parts: Electro Damage +15%. 2 parts: Elemental Mastery +80 points. | Universal kit for playing through reactions. Increases elemental damage and grants elemental mastery, which increases damage from interaction between elements. |
| Thundering Fury / Gladiator’s Finale / Shimenawa's Reminiscence ⭐️⭐️⭐️⭐️ ⭐️⭐️⭐️⭐️⭐️ | 2 parts: Electro Damage +15%. 2 parts: Attack Power +18%. | A versatile combination that is suitable for basic DD, boosting your own damage in mono-Electro builds, as well as when playing through the Escalation reaction. |
Squads for Yae Miko
Yae Miko is a fairly flexible character that pairs with almost all elements and heroes. At the same time, she can be both in the role of partial support and in the role of the main damage dealer.
Best characters
When assembling a team for Yae Miko, you can use the following characters:
| Character | Element | Weapon | Effects |
|---|---|---|---|
 Raiden Raiden |  electro electro |  A spear A spear | Will flood energy and increase the damage of the ult. In addition, Yae herself has an expensive elemental explosion, which goes well with Raiden's mechanics. |
 Fischl Fischl | electro |  Bow Bow | If Raiden isn't there, Fischl is a perfect partner. Deals good damage and fills energy, being a "battery". |
 Beidou Beidou | electro |  Two-handed sword Two-handed sword | Can be used if you take Yae as the main damage dealer. At the same time, both characters have expensive elemental explosions. Although they belong to the same element, for greater comfort it is desirable to have at least one Favonius weapon. |
 Sarah Sarah | electro | Bow | It has an excellent buff to attack power, however, the presence of C2 is desirable. On the last awakening, increases critical Electro damage by 60%. |
 Dory Dory | electro |  Two-handed sword Two-handed sword | Elemental explosion heals and restores energy. |
 Shinobu Shinobu | electro | Two-handed sword | The skill creates an electric ring around the active character - it heals with a certain frequency and deals damage to nearby enemies. |
 Tignari Tignari |  Dendro Dendro | Bow | The main DD in the squad through Stimulation. Under passive totem damage, Yae Miko activates the Growth reaction, dealing increased damage to Dendro. |
 Kaveh Kaveh | Dendro |  Two-handed sword Two-handed sword | The main DD, which shows itself well in Budding. At the same time, he can play through Aggravation, Vegetation. |
 Al-Haytham Al-Haytham | Dendro |  One handed sword One handed sword | Dendro DPS character with infusion. Has good mobility and deals high damage with reactions. |
 Nahida Nahida | Dendro |  Catalyst Catalyst | Distributes a large amount of "strong" Dendro status for 25 seconds. Can increase Elemental Mastery up to 200 points. |
 Dendro Traveler Dendro Traveler | Dendro | One handed sword | The best F2P Dendro app. It also increases Elemental Mastery with a passive talent. Easy to get C6. |
 Collei Collei | Dendro | Bow | Deals additional damage from Dendro reactions. At C4, increases Elemental Mastery by 60. |
 Yao Yao Yao Yao | Dendro |  A spear A spear | Great applicator and healer. An elemental explosion can also cause reactions on its own. |
 Bai Zhu Bai Zhu | Dendro | Catalyst | Shield and healer. Can impose a Dendro status on enemies outside the battlefield. |
 Kazuha Kazuha |  Anemo Anemo |  Sword Sword | In addition to being an Anemo support, it does a lot of elemental damage. In addition, it has good control. |
 Sucrose Sucrose | Anemo |  Catalyst Catalyst | Budget version of Kazuha. It gives more energy, and instead of an elemental attack, floods elemental mastery, which will be useful when playing through reactions. |
 Lan Yan Lan Yan | Anemo | Catalyst | Anemo shielder, capable of playing both as a support and as a full-fledged driver from normal attacks. Deals damage with his ult and pulls down. |
 Zhongli Zhongli |  Geo Geo | A spear | Provides a strong shield and lowers enemies' resistance to all types of damage. An elemental explosion will stun enemies. |
 Xingqiu Xingqiu |  Hydro Hydro | Sword | Perfect as a secondary damage dealer if Yae is the main damage dealer. And as a partner in other roles, it’s also not bad, because it can cause good damage. |
 Mona Mona | Hydro | Catalyst | Maintains Hydro status on enemies and can wear Dragon Slayer Epic. Her elemental blast can make Yae's ult even stronger. |
 Kokomi Kokomi | Hydro | Catalyst | One of the best healers in the game, and also able to deal decent damage during his ult. |
 Bennett Bennett |  Pyro Pyro | Sword | Bennett's attack power buff is the strongest in the game. In addition, he can heal. |
 Pyro GG Pyro GG | Pyro | Sword | Can play as a sub-DD or main-DD by invoking Overload, using skill and ult or normal/charged attacks. |
 Mavuika Mavuika |  Pyro Pyro |  Two-handed sword Two-handed sword | Mavuika will be able to fulfill the role of the main damage dealer, striking down enemies with charged attacks. |
 Yoimiya Yoimiya | Pyro | Bow | Yae will provide a large amount of Electro status for Eimiya. The archer herself plays well through the Overload reaction thanks to ranged attacks. |
 Eola Eola |  Cryo Cryo | Two-handed sword | Yae will provide Eola with the Superconductor reaction, which will lower the physical resistance of opponents. |
 Neuvillette Neuvillette |  Hydro Hydro | Catalyst | Needs allies of other elements in order to create elemental reactions increase your damage with passive abilities. Since Yae Miko's totems attack regardless of the actions of the active hero, she combines well with Nevillet, who deals the main damage through charged attacks. |
 Furina Furina |  Hydro Hydro | Sword | Perfect for Yae Miko in any role. The buff to increase the damage from Furina's ultimate also works on inactive characters, so the kitsune will always benefit from playing together. |
 Mizuki Mizuki |  Anemo Anemo |  Catalyst Catalyst | Mizuki's driver role pairs well with Yae Miko's totem gameplay. |
Top Teams
Example units with Yae Miko based on the above heroes:
| Character 1 | Character 2 | Character 3 | Character 4 | Features |
|---|---|---|---|---|
| Tignari |  Yae Miko Yae Miko | Fischl | Zhongli | Tignari is the backbone of the group, applies Dendro status to enemies and is on the battlefield most of the time. Yae Miko casts Electro status to trigger the Growth or Escalation reactions. Fischl helps Yae Miko with energy particles and deals additional damage. Zhongli protects the squad and debuffs opponents. |
| Al-Haytham | Yae Miko | NahidaDendro gg | Shinobu | Squad through Sprawl where Al-Haytham is the main DD. Nahida and Yae Miko use their skills on a rollback. Shinobu, if necessary, heals, deals additional Electro damage with an elemental explosion. |
| Kaveh | Yae Miko | Beidou |  Yao Yao Yao Yao | A squad with Kaveh as a damage dealer through Growth. Yae Miko and Beidou energize each other by applying Electro status to trigger reactions. Yao Yao activates Dendro resonance and heals. |
| Mavuika |  Ororon Ororon |  Yae Miko Yae Miko |  Chevreuse Chevreuse | A squad with Pyro and Electro Resonances via Overload. Chevreuse can generally be replaced with Shilonen, but removing Ororon without Shilonen is highly discouraged, as Mavuiki will have problems activating the ult. |
| Yae Miko |  Fischl Fischl | Collei | Bai Zhu | Yae Miko is the main damage dealer that attacks enemies with the Dendro status, causing the Aggravate reaction. Fischl helps replenish energy for Yae's ult. Kollei - distributes Dendro status. At C4, increases Elemental Mastery by 60. Bai Zhu - closes the resonance, imposes a shield and heals. It also acts as a Dendro applicator. |
| Yae Miko | Nahida | Raiden Dory Dory | Xingqiu Ye Lan Ye Lan | Yae Miko receives a huge buff from Nahida, dealing increased Electro damage from Escalation. Raiden - secondary dd, electro resonance and battery. Can be replaced with Dory - less damage, but more healing. Xingqiu/Ye Lan give Hydro status to create Dendro cores, deals additional damage. Can be replaced with Kokomi for healing if using Raiden. |
| Yae Miko |  Mona Mona | Dendro gg | Shinobu | Yae Miko is the main damage dealer that deals damage to Dendro cores created by the reaction of Dendro and Hydro and turns them into projectiles. Mona hands out Hydro status for the buds to appear. Shinobu helps Yae activate Vegetation with an elemental skill (ring) and an ult, heal. Can be replaced with Dory for more energy recovery. Dendro Traveler is an applicator that increases elemental mastery with a passive talent. |
 Yoimiya Yoimiya | Yae Miko |  Sarah Sarah | Zhongli Laila Laila | Detachment with Eimiya through Overload. Although the archer can activate reactions from a safe distance, shields are needed to keep attacks from interrupting. |
 Yanfei Yanfei Klee Klee | Yae Miko |  Venti Venti | Bennett | In the world where Kazuha exists, the Anemo Archon has become less popular. But in this group, his screed will be extremely effective - while the enemies scatter from the Overload reaction, Venty keeps them together. At this time, Bennet buffs everyone, heals and closes the Pyro resonance. |
| Eola | Yae Miko |  Yun Jin Yun Jin |  DioneLaila DioneLaila | Physical detachment with Aeola. Yae Miko provides Electro status on the field for Eola to summon the superconductor. Yun Jin buffs the swordswoman's normal attacks, and Diona/Lyla gives extra. Cryo status and maintain team survivability. |
| Mizuki | Yae Miko | FischlOroron | Furina | Hydro-Electro team, consisting of three sub-DDs and one driver, who also occupies the healer position. Due to the Anemo healer in the main role, the team is protected from damage and buffed by Furina's fanfares, and the main damage comes from a mixture of Charged and Dispel reactions. |
| Neuvillette | Yae Miko |  Kazuha Kazuha Sucrose Sucrose | Bai ZhuYao Yao | A unit from the reaction Charged and Vegetation, which fully implements Nevillet's passive ability, allowing him to gain all stacks of damage. Yae Miko deals damage outside the field, Dendro the healer backs up Nevillet and protects other allies, Anemo support inflates the elements, reducing resists and increasing damage. |
 Xiao Xiao | Yae Miko | Raiden |  Jean Jean | Quite an interesting option under Xiao. A pair of Xiao and Jinn are already self-sufficient, especially if the latter is C4. But Raiden and Yae will contribute damage. In addition, the energy in the group is replenished quite cheerfully. |
| Yae Miko | Fischl | Mona | Kokomi Barbara Barbara | Group through reaction Charged. Yae and Fischl pair well, buffing and boosting each other's ults. Mona synergizes with both and distributes Hydro status. Kokomi or Barbara complete the group with healing. |
| Yae Miko | Beidou | Kazuha | XingqiuYe Lan | Kazuha accelerates Electro damage. Xingqiu/Ye Lan give a lot of Hydro status. Yae and Beidou pump each other's energy, dealing damage. |
| Yae Miko | Sarah | Yun Jin | Yao Yao | Yao Yao in this unit acts as a healer and applicator. Sarah gives a bonus to attack power and pumps up energy. Yun Jin buffs normal attacks during her ult. |
| Yae Miko |  Raiden Raiden | Sarah | Zhongli | Mono-Electro Squad. In this case, Yae Miko may well realize a set Calming thunder. Zhongli skill (shield) additionally lowers the resistance of opponents. |
| Yae Miko | Furina | FischlYe Lan |  Zhongli Zhongli Jean Jean | Reaction command Charged. Since Furina increases the damage of all allies, in a team with her it is more profitable to give preference to an additional damage dealer rather than a buffer. You can take any sub-DD of Hydro or Electro elements for his role. The fourth slot should be occupied by a healer or shieldman with useful functions, for example, Zhongli in the set archaic stone or Genie in emerald shadow. |
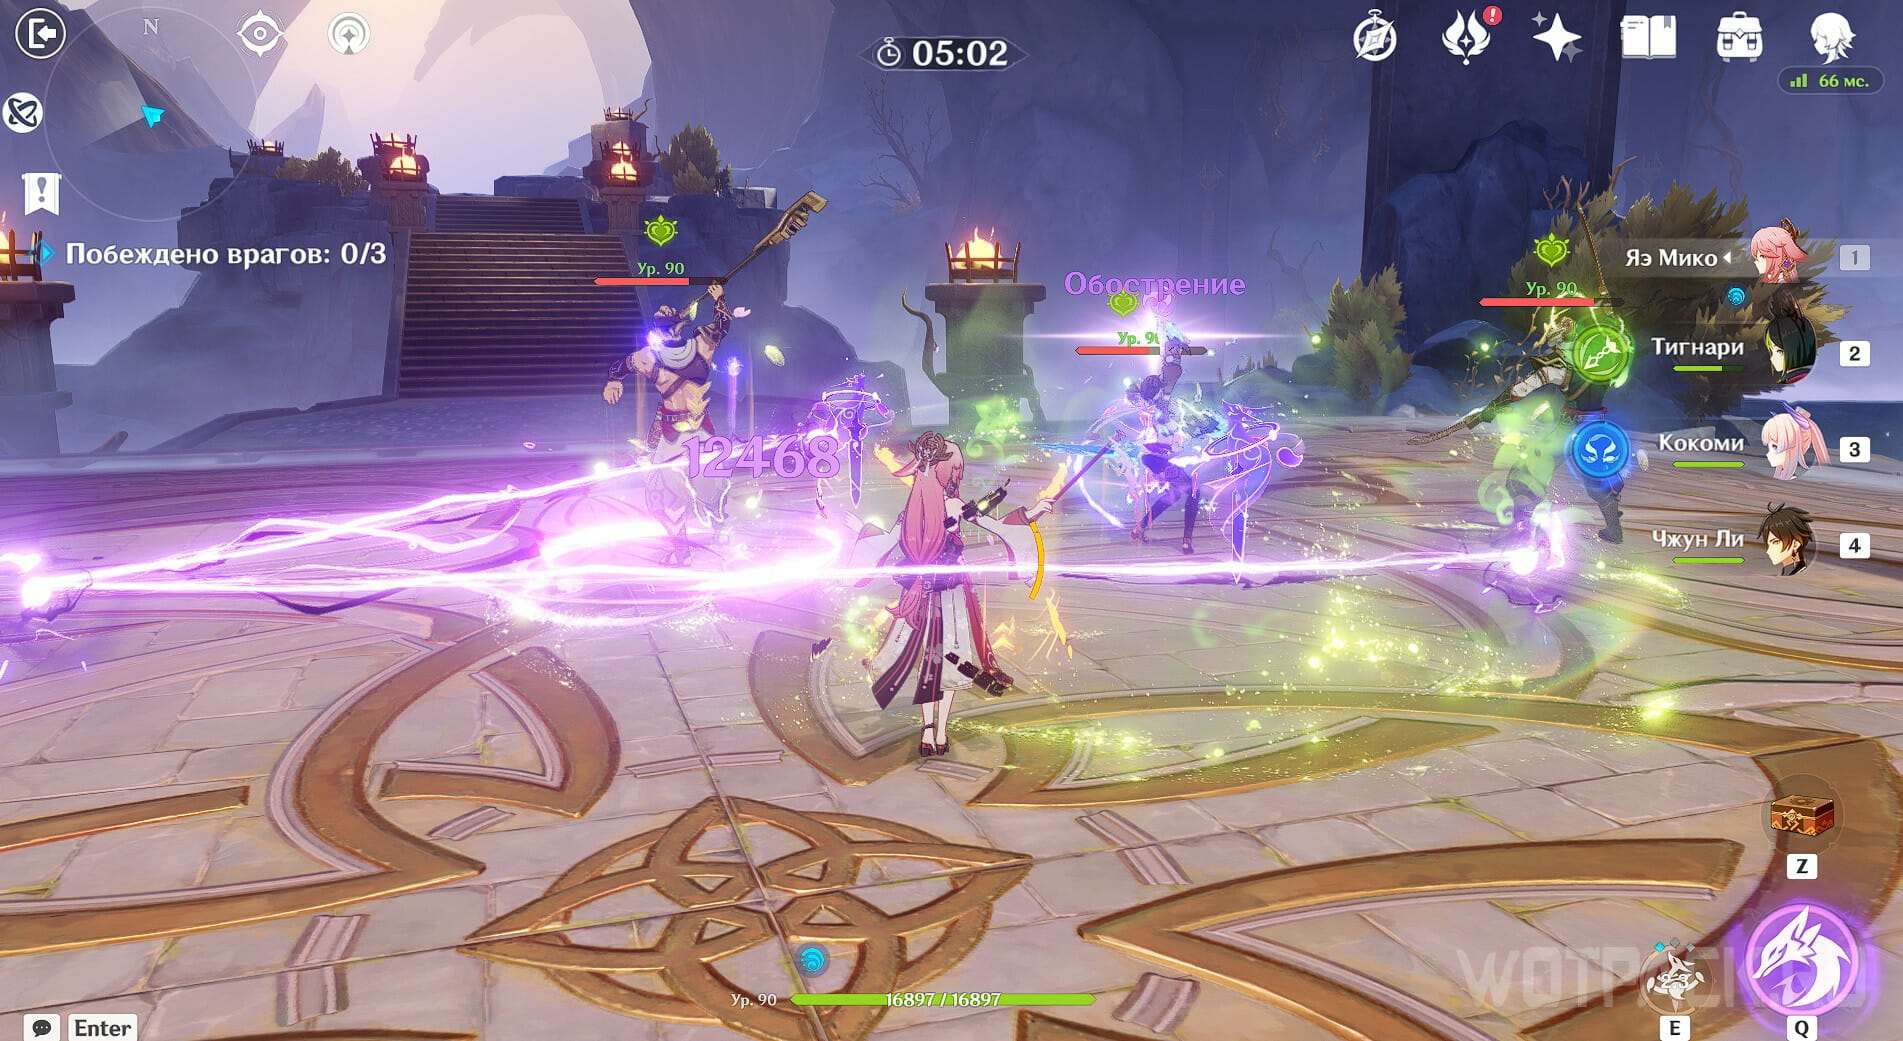
How to play as Yae Miko

Elemental skill deals periodic damage after activation. Therefore, first of all put all the sakura branches at once where the battle is to take place. Also, the skill has a low cooldown and a built-in dash, which allows you to partially use it instead of dodging and save energy.

The ult must be activated when all 3 Sakura are on the battlefield, as it is quite expensive, and the damage is highly dependent on each branch. After the explosion of the elements, we immediately reinstall the totems so as not to lose damage.
Rotation
Yae Miko feels great playing through Dendro reactions Stimulation (Exacerbation, Growth) and Vegetation. In such builds, she is able to maximize both her own damage and the DPS of the entire squad.
Reaction game Stimulation
In the Electro + Dendro team, Yae's rotation depends on her role:
- If sup-dd - put totems and switch to Dendro to cause Growth.
- If the main DD - first we impose the Dendro status, and why switch to Yae, put the elemental skill and hit from the hand under Aggravation, causing increased Electro damage.
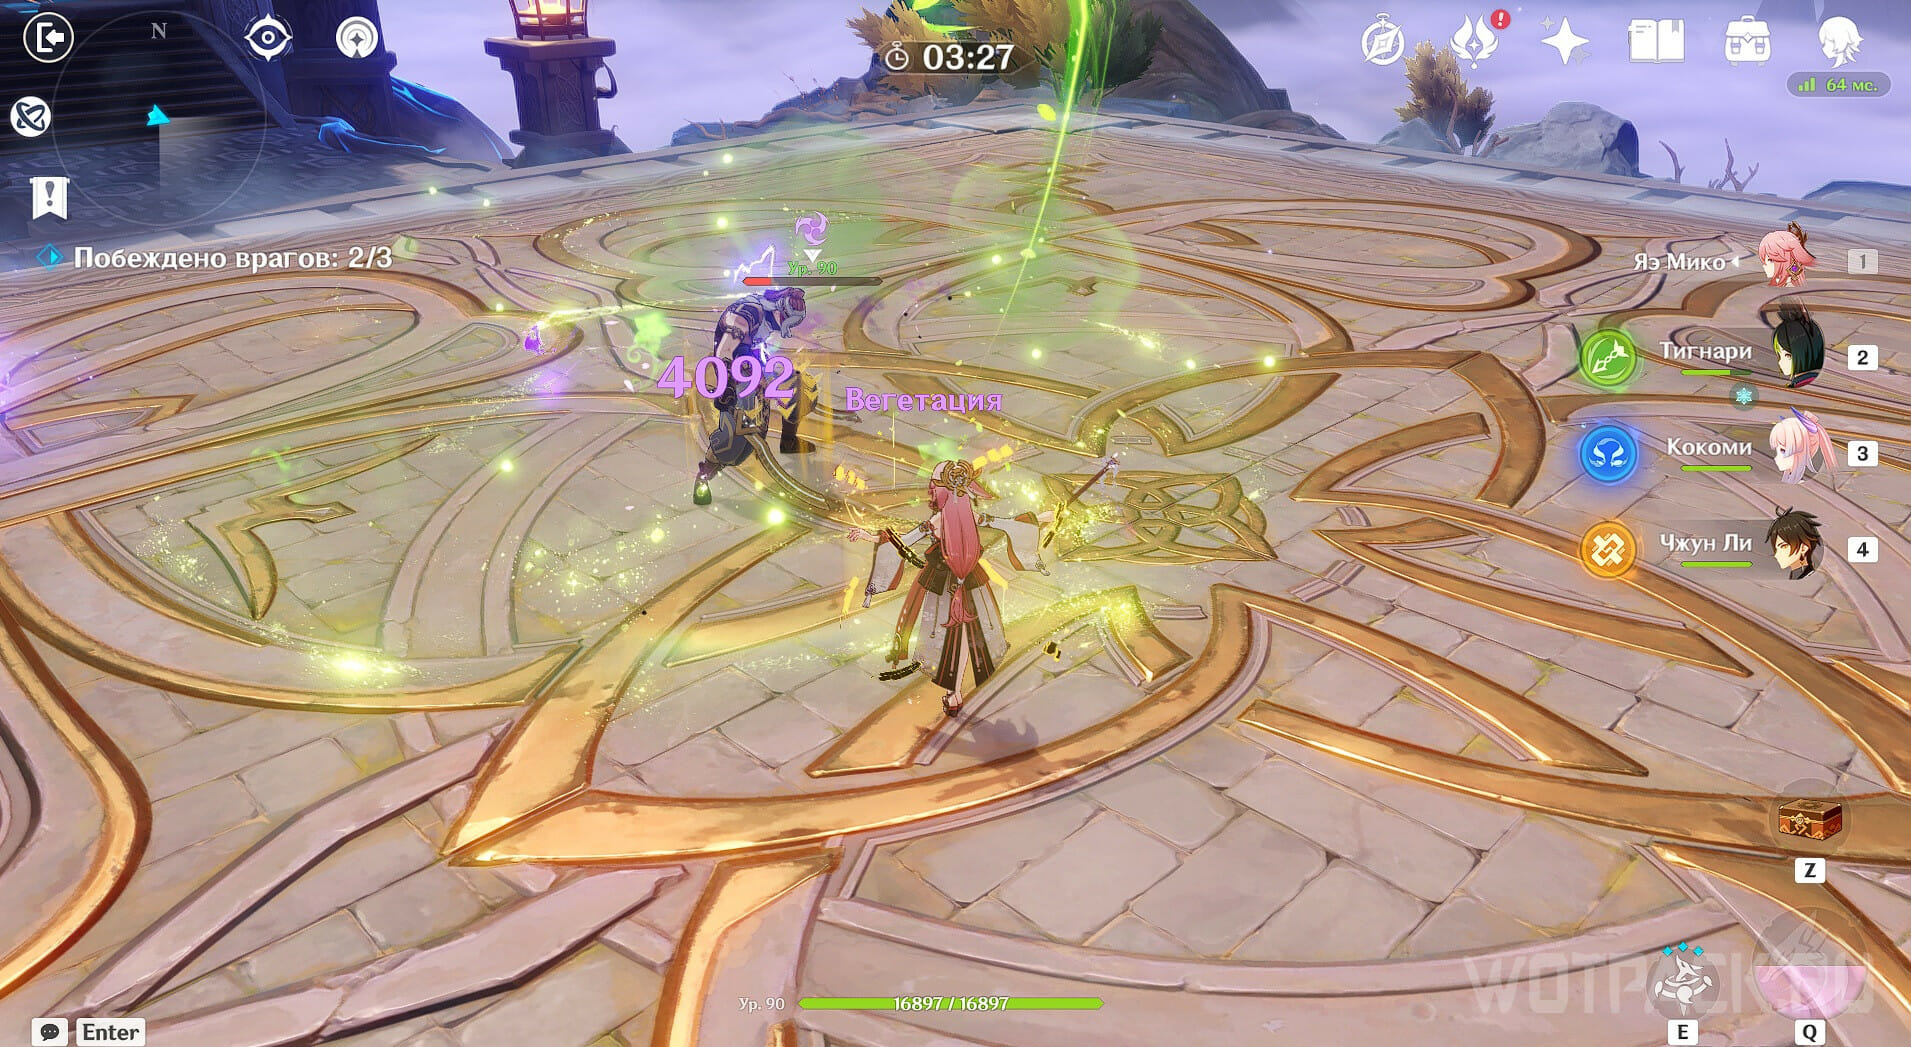
Vegetation reaction game
For Vegetation, the principle is the same: as soon as buds appear from the interaction of Dendro and Hydro, we attack them with electricity from skills or ordinary blows. After that, the cores will turn into homing projectiles and deal damage to nearby enemies. In this case, the damage depends solely on mastery of the elementsbecause it is a 2nd order reaction.
Game from reactions Overload, Charged and Superconductor
The high priestess can show herself well in squads through Overload и charged. However, in terms of damage and effectiveness, they are still inferior to the previous ones. Separately, it is worth highlighting Superconductor. By itself, the reaction does not cause damage, but only reduces the physical resistance of enemies. For the heroine herself, this is useless, but as a sub-DPS for Electro status, it can be used quite well. In these builds, Miko only needs to place totems to help trigger the desired reactions, and then use the burst of the elements when he is ready.
Сonclusion
Yae Miko is an Electro character that can deal both periodic damage and huge explosive damage. Her skills are fairly self-explanatory and easy to use, making her a hero suitable for beginners. At the same time, potentially high damage makes Yae desirable for experienced players who have made it to the late game. The character is best revealed in combination with Dendro, although he also has his own high damage.
We will continue to write detailed builds on all released characters so that you can effectively use them in your squads when conquering the world of Teyvat. Also, in a separate article, we recommend that you familiarize yourself with best character builds for any kind of gameplay.
Q&A by Yae Miko
Who is Yae Miko?
Yae Miko is the 5⭐️ playable Electro elemental character in Genshin Impact. Serves at the Great Sakura Shrine as Guji and is the editor of the Yae Publishing House.
When was Yae Miko added to Genshin?
Yae Miko was added to the game on February 16, 2022.
Who voices Yae Miko?
English voice actress - Ratana. Japanese voice actress - Ayane Sakura. Chinese voice actress - Mingya Du. Korean voice actress Moon Yoo-jeong.
What group does Yae Miko belong to?
Narukami Great Shrine, Yae Publishing House.
When is Yae Miko's birthday?
27 of July.
What is the zodiac sign of Yae Miko?
Cancer.
How old is Yae Miko?
Yae Miko's age exceeds 500 years, but outwardly the girl looks 25-27.
How tall is Yae Miko?
Yae Miko's height is 170-175 cm.
Where is Yae Miko from?
Inazuma.
What is the element of Yae Miko?
Electro.
Where is Yae Miko's Eye of God?
Placed on the right earring.
What is the name of the constellation Yae Miko?
Divine Kitsune.
What is the personality of Yae Miko?
Yae Miko is cunning and passionate about her own interests, as well as playing pranks on people. Her sharp mind and insight help her achieve her goals.
What does Yae Miko love?
Yae Miko's favorite dish is Udon Kitsune.
When is Yae Miko coming?
Yae Miko's reran is planned for patch 3.7.
What to download Yae Miko?
Yae Miko first needs to level up the elemental skill, and then the elemental explosion. If the heroine does not attack from her hand, then there is no need to pump normal attacks.
What artifacts are better to put on Yae Miko?
Yae Miko needs Gilded Dreams.
What is Yae Miko's signature weapon?
Signa Yae Miko - The Truth of Kagura.
What is the best weapon for Yae Miko?
Kagura's Verity, Prayer to the Holy Winds, Sky Atlas.
How many sea mushrooms does Yae Miko need?
168 pieces.
How much hero experience do you need for level 90 Yae Miko?
To level up Yae Miko to level 90, 421 hero experience books are required.
Why is Yae Miko afraid of Ayato?
Yae Miko feels annoyed by Ayato as she cannot understand him. She is used to seeing people through, so she is strained to communicate with him.
Who is Yae Miko to Raiden?
Yae Miko is Raiden's best friend and her familiar. She has served her and Inazuma for hundreds of years, looking after the welfare of the people and Raiden.
What is Yae Miko's last name?
Yae's last name is Miko. She is also known as Guji Yae.
Who is Yae Miko in lore?
According to the lore of the game, Yae Miko appears as the high priestess of the Narukami Great Shrine, who simultaneously holds the role of editor-in-chief of the Yae publishing house.
What does Yae Miko say about Scaramuccia?
In the Archon quest, Yae Miko revealed that Scaramuccia used to be weak and only gained his main strength when he entered Fatui.
What does Yae Miko's gesture mean?
Yae Miko's gesture is called the "mudra of Karana" and is a symbol of the expulsion of evil and negativity. The roots of this gesture come from Buddhism.
Why doesn't Yae Miko have a tail?
Yae Miko hides her tails because she thinks people shouldn't see them.
How many tails does Yae Miko have?
Yae Miko has five tails corresponding to her five centuries of life.
How does Yae Miko translate?
The name Yae Miko is translated from Chinese as "Mysterious Temple Attendant".
What is the name of Yae Miko?
Yae Miko has many names, including: Guji Yae, editor of the Yae Publishing House, priestess of the Narukami Great Shrine, Kitsune.